Astrophotography is one of the fastest-growing photography disciplines, driven partly by cameras that can now capture the Milky Way handheld and partly by the community of YouTube and Instagram creators who have made night sky photography aspirational for a much wider audience than the astronomy hobbyist base.
The photography content that performs best in this niche consistently combines two elements: the technical education (how do you get those settings right, how do you find dark sky locations, how do you plan a Milky Way session) and the experience of actually being out there at 2am with a tripod under a sky that looks nothing like what most people have ever seen. A POV video captures both simultaneously.
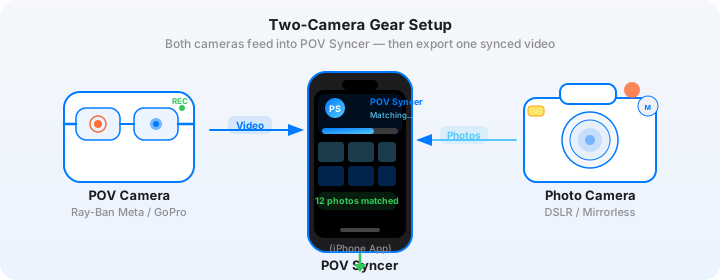
The challenge is the editing. An astrophotography session can span four to six hours of darkness, with exposures of 15-25 seconds each, and perhaps 30-50 keeper frames from a good night. Manually matching those exposures to the moments in four hours of GoPro footage — finding the precise second each shutter opened — is the definition of tedious. POV Syncer's automatic EXIF timestamp matching does it in under 60 seconds.
What Are Astrophotography POV Videos?
An astrophotography POV video is a first-person recording of your night session, with your finished night sky images appearing as overlays at the moments you captured them. The POV camera records the session: the drive to the dark sky site, the setup process, the waiting, the moment you first see the Milky Way core clearing the horizon, the hours of exposures in between. Your stills camera produces the images that appear as overlays — each one a revelation against the dimly lit POV footage of a person standing alone in the dark under the stars.
The format works uniquely well for astrophotography because of the contrast between the POV footage (a person in darkness, barely visible) and the revealed image (the Milky Way arching across the frame in extraordinary detail). That contrast is more dramatic in astrophotography than in almost any other photography genre.
Astrophotography YouTube is also one of the highest-intent niches in photography content. Viewers are specifically searching for how to do this — they want settings, they want planning tools, they want to see the real-world experience of a dark sky session. A POV video that delivers all three elements in one package is exactly what that audience is looking for.
Why Astrophotographers Need This Format
Astrophotography is a deeply process-oriented discipline. The planning alone — PhotoPills for Milky Way core timing, Light Pollution Map for site selection, weather forecasting for cloud-free windows — takes as long as the actual session. A YouTube video that shows both the planning and the execution is performing a genuine educational service to an audience that is actively trying to replicate your results.
- Show the full arc — from packing the car at 11pm to watching the first stars appear to the moment the Milky Way core rises above the horizon: this is a story that compresses beautifully into an 8-10 minute YouTube video
- Technical narration value — explaining your settings (f/2.8, ISO 3200, 20 seconds, Nikon Zf) with AI narration as each image overlay appears gives viewers immediately actionable technical information
- Location showcase — astrophotography locations are inherently beautiful; POV footage of a dark sky site in the UK, the Atacama, the Scottish Highlands, or the Mojave is compelling even without the astronomical content
- Review your own work — watching a timelapse-compressed POV video of your own session reveals compositional choices and equipment decisions you made intuitively at 2am that benefit from retrospective analysis
Get the free POV Photography Cheat Sheet
Camera settings, EXIF tips, and export presets for GoPro Hero 13, DJI Action 5 Pro, and Insta360 — including a night photography settings section for low-light POV footage.
Free PDF, no spam. Unsubscribe anytime.
Pick Your POV Rig for Night Sky Sessions
Astrophotography sessions present several unique mounting challenges: you are working in near-total darkness, often in cold conditions, and you need a rig that can record usable footage in extremely low light while staying out of the way of your main camera operation.
Chest Mount: GoPro Hero 13 in Night Mode
The GoPro Hero 13 in Night mode (or Night Lapse video) can capture ambient darkness footage at a dark sky site. It will not show the night sky in the way your main camera does — the GoPro's small sensor is not capable of astrophotography — but it captures enough ambient light (headlamp, faint Milky Way glow, ground-level environmental light) to make the POV footage legible and atmospheric.
For astrophotography POV specifically, Night Lapse video mode on the GoPro is often the most effective choice. This records a timelapse at an extended shutter speed per frame — the resulting footage compresses a four-hour session into a 4-8 minute video, showing the movement of the stars across the sky over the course of the night. Your astrophotography still image overlays then appear at the correct relative moments in this compressed timeline. The result is one of the most compelling formats in astrophotography content.
GoPro Hero 13 settings for astrophotography sessions:
- Mode: Night Lapse Video for time-compressed sessions (recommended); standard video for real-time documentation
- Shutter (Night Lapse): Auto or 30 seconds — at 30 seconds per frame, a 4-hour session compresses to about 8 minutes of footage
- ISO: 1600-3200 for night lapse to capture ambient darkness
- Resolution: 1080p is sufficient for night lapse content; 4K if you have a later model and want the resolution for cropping
- Time sync: Critical — sync from GoPro Quik app before leaving for the location
Head Mount for Real-Time Documentation
A head-mounted GoPro Hero 13 or DJI Action 5 Pro captures the most natural real-time perspective of the session — you walking around the location, setting up the tripod, checking the focus star, reviewing the first test exposures. For viewers who want to feel the actual experience of a dark sky session rather than a timelapse summary, real-time head-mount footage is more immersive.
Insta360 GO 3S on Camera Bag
Clipping an Insta360 GO 3S to your camera bag strap or jacket gives a low, stable perspective that works well for the static phases of an astrophotography session — the periods when you are standing at the tripod, waiting for exposures to complete. This perspective shows the stars moving across the sky behind you as the session progresses, with your astrophotography images appearing as overlays whenever the shutter fires.
The Gear: What Astrophotographers Actually Use
Stills Camera: Nikon Zf
The Nikon Zf has emerged as one of the preferred bodies for Milky Way and night sky photography in 2026. Its 24.5-megapixel BSI-CMOS sensor performs exceptionally at high ISO — usable files at ISO 6400, good files at ISO 3200, excellent at ISO 1600. The full-frame sensor's larger photosites collect more light per pixel than APS-C alternatives, which translates directly to better high-ISO noise performance at the long exposures astrophotography requires.
The Zf's film-inspired design is also relevant for content: it photographs beautifully, and a POV video that shows a classically styled mirrorless camera set up under the stars has a visual quality that resonates strongly with the astrophotography audience.
Settings for Milky Way photography with the Nikon Zf:
- Lens: Nikkor Z 20mm f/1.8 S or Z 24mm f/1.8 S — both are outstanding wide-aperture primes for astrophotography; the 20mm gives slightly more sky coverage while keeping stars reasonably round near the corners
- Shutter speed: Use the 500 Rule or NPF Rule — for 20mm on full frame, the NPF Rule gives approximately 14-20 seconds before noticeable star trailing; at 24mm, approximately 12-17 seconds
- Aperture: f/1.8 to f/2.8 — f/2.8 gives better corner sharpness and less coma than wide open; f/1.8 is reserved for when you need maximum light and corner quality is secondary
- ISO: ISO 3200 as a starting point — go to ISO 6400 in darker skies or if you need a shorter shutter speed; use the histogram to ensure the sky is exposed correctly without blowing highlights
- Focus: Manual, using live view magnified to a bright star; autofocus does not work in very dark conditions
- Interval shooting: Use the Nikon Z intervalometer app or built-in interval timer for automated sequences
The Hard Part: Manual Astrophotography Editing
Before POV Syncer, matching astrophotography images to POV session footage required manually scrubbing through four to six hours of footage to find the 30-50 exposure moments, then placing each selected final image at the correct timeline position in Premiere or Final Cut. For a full night session, this process easily took three to four hours of additional editing work.
The mental load is significant too: astrophotography already requires considerable post-processing work — stacking images to reduce noise, gradient removal, Milky Way colour and structure enhancement. Adding several hours of BTS video editing to that workflow is a real barrier, and most astrophotographers simply do not produce the BTS content that their footage could support.
The Fix: EXIF-Precise Astrophotography Sync
POV Syncer reads the EXIF DateTimeOriginal field from every Nikon RAW file. For astrophotography, this timestamp records the moment the shutter opened for each exposure — precise to the second. The matching against the GoPro Night Lapse footage (or standard video footage) works the same way it does for daytime photography: each astrophotography still is placed at the second it was captured in the POV footage.
For Night Lapse footage specifically, the timing relationship between the original real-time timestamps and the compressed video timeline requires an understanding of the compression ratio. If your Night Lapse captured one frame every 30 seconds of real time, a 4-hour session (14,400 seconds) becomes approximately 480 frames of footage — about 8 minutes at 60fps. POV Syncer handles this temporal mapping automatically, placing your still images at the correct compressed timestamp in the Night Lapse video.
Try it with your next dark sky session — free on TestFlightStep-by-Step: Building Your Astrophotography Session Video
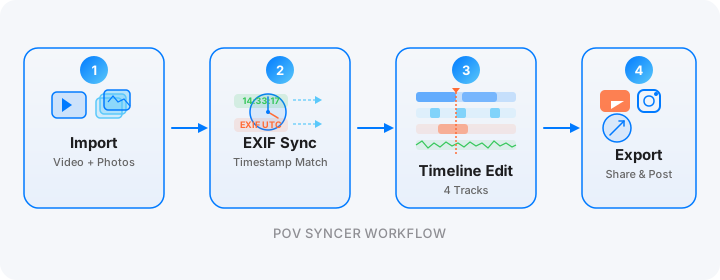
Step 1: Import. Transfer your GoPro Hero 13 footage from the GoPro Quik app or card reader. Transfer your Nikon Zf RAW files. Create a new project in POV Syncer — the app handles up to 2,000 items per project. Import the Night Lapse footage (which may be a single long clip) and your processed, final Milky Way images.
Step 2: Review the match preview. For standard video footage, you should see your Milky Way images distributed across the session timeline, clustered at the periods when you were actively shooting. For Night Lapse footage, POV Syncer maps the real-time EXIF timestamps of your stills to the corresponding frames in the compressed footage. Review the match preview tutorial for guidance on Night Lapse temporal mapping.

Step 3: Process. Tap Process. On-device processing — your night sky images and session footage stay private.

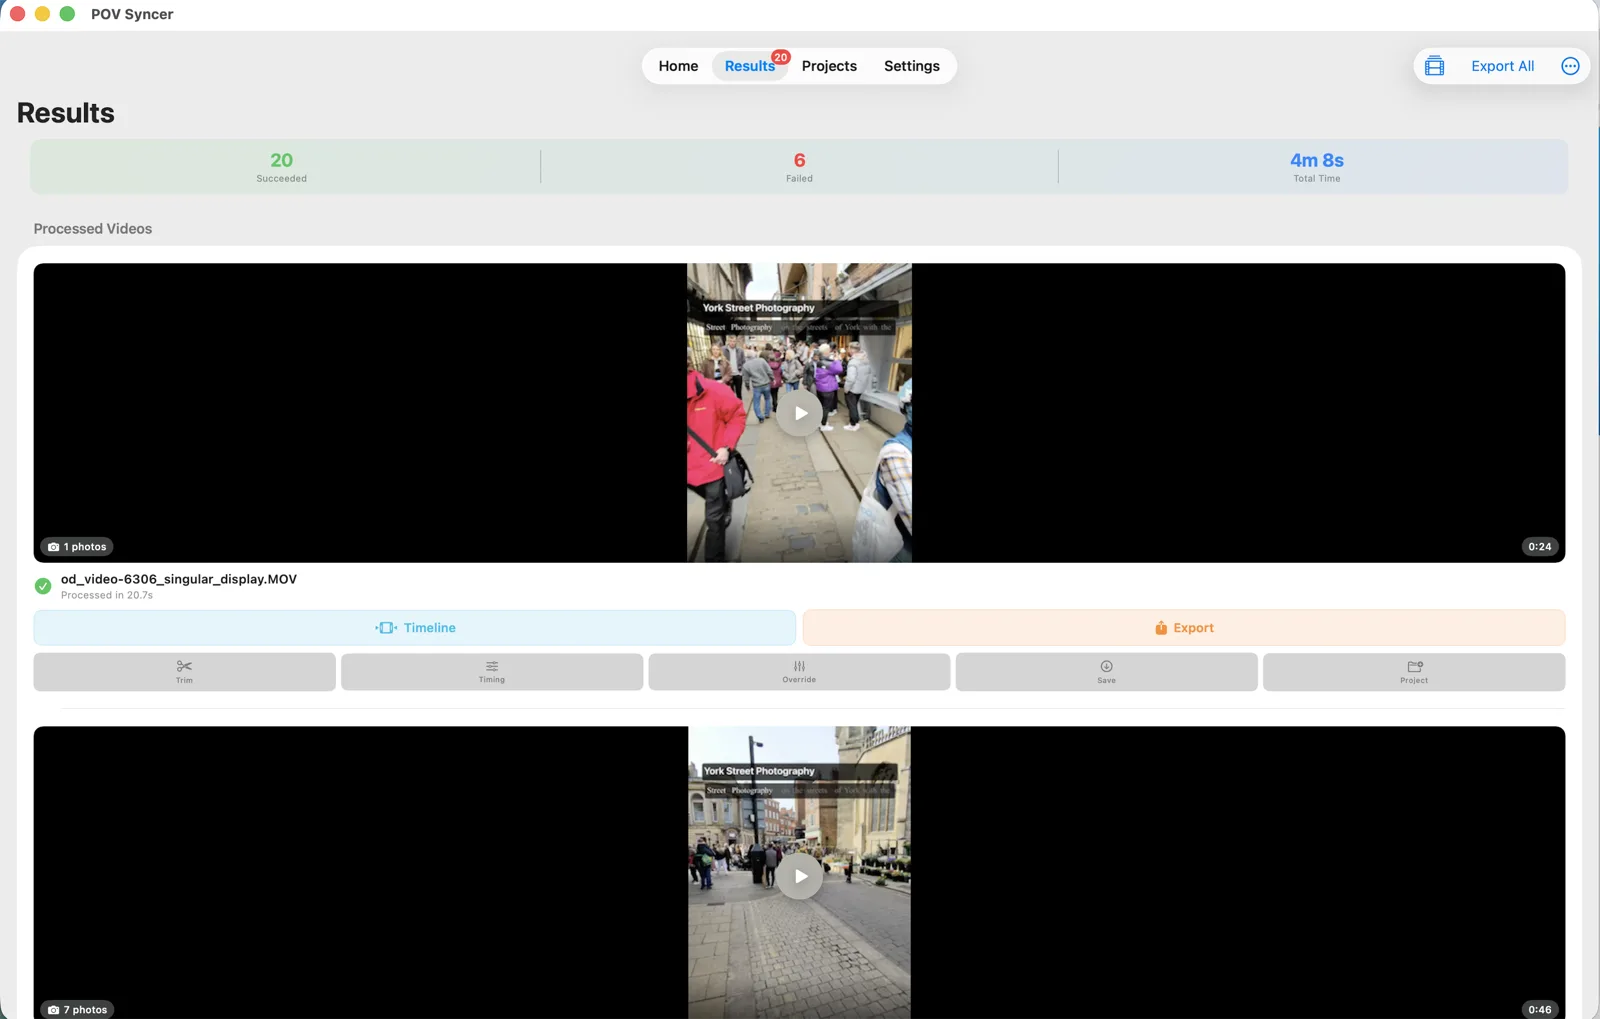
Step 4: See results and open the timeline. The results view shows your Milky Way images on the GoPro timeline. For a good night session with 40 keeper frames, you will see 40 overlay moments distributed across the footage — telling the story of where the most productive shooting phases of the night were.


Step 5: Add location and settings titles. For astrophotography content, title overlays should include the location, the moon phase, the time, and the key exposure settings. This is the information that the astrophotography audience needs to replicate your results — and providing it directly in the video is a significant reason to subscribe. Use AI narration to expand on this: which area of the Milky Way you are shooting, what the seeing conditions were like, why you chose this composition over another you tried earlier.
Step 6: Export. For YouTube: 10-12 minute Night Lapse session with narration, showing the complete night from setup to the Milky Way core at peak. For Instagram Reels: 60-90 second cut showing the setup process and three or four of the strongest image reveal moments. Both from the same POV Syncer project.
Works on iPhone, iPad, and Apple Silicon Mac
Astrophotography typically involves large RAW files from a full-frame camera. The Mac version of POV Syncer handles large file imports efficiently, with direct access to card reader imports and the full-screen timeline editor that makes working with long Night Lapse footage much more manageable than on a phone screen.
Under the Hood: EXIF Sync for Astrophotography
Astrophotography EXIF sync has one specific consideration: the exposures are long (15-25 seconds), and the DateTimeOriginal timestamp records the moment the shutter opens, not when it closes. For most astrophotography content this makes no practical difference — a 20-second offset within a 4-hour session is invisible. But it is worth knowing for any precision timeline work.
- Four-strategy EXIF cascade — for the Nikon Zf, the OffsetTimeOriginal strategy is most relevant: Nikon's modern Z bodies embed UTC-aware timestamps that POV Syncer can use for accurate cross-camera matching
- Adjustable match tolerance — for astrophotography where the interval between shots is typically 30-60 seconds (exposure + readout + interval timer pause), a tight tolerance (5-10 seconds) gives clean one-to-one matches without false positives
- Per-video timing offset — if your GoPro clock and Nikon clock diverged over a long night (clock drift is real in cold conditions), apply a global offset to correct it without reimporting
- Night Lapse temporal mapping — POV Syncer understands the relationship between the real-time EXIF timestamps of your stills and the compressed timeline of Night Lapse footage, placing images at the correct frame in the compressed video
- Fully on-device processing — handles large RAW files from the Nikon Zf without any cloud upload; only AI narration synthesis uses the internet
Astrophotography-Specific Tips for Better POV Videos
Sync Your Clocks Before Leaving Home
At a remote dark sky site, you will not have reliable mobile signal to sync your GoPro from the Quik app. Sync both the GoPro and your Nikon at home before departing. In cold conditions, battery performance degrades — keep both cameras warm until you start shooting, and recheck clocks when you power up at the location.
Use Night Lapse for YouTube Sessions
A 4-hour session compressed into 8 minutes of Night Lapse footage is a much more viewer-friendly format for YouTube than 4 hours of real-time footage. The compressed footage shows the star movement, the changing sky, and the photographer's activities in a way that is visually engaging throughout. Your Milky Way image overlays appear at the correct relative moments in this compressed timeline.
Plan Your Composition Changes as Content Beats
Most astrophotographers shoot several different compositions over the course of a session — different foreground subjects, different sections of the Milky Way. Plan each composition change as a content beat. The POV video shows you moving to a new position and framing a new composition; the image overlay shows what emerged from that decision. This gives the video a natural narrative structure — exploration, decision, reveal.
Include the Planning Phase
Some of the most popular astrophotography YouTube content starts before the shoot — the location scouting, the PhotoPills planning session, the weather forecast review. Consider adding a short planning segment at the start of your POV session video, narrated with AI voice explaining how you chose the location and timed the session around the Milky Way core rise.
Let Photo Hold Duration Match the Image Quality
A Milky Way image with exceptional foreground composition and atmospheric colour deserves 4-5 seconds of hold time in the timeline editor. A test shot or a less successful composition warrants 1-2 seconds or exclusion from the final cut. Use the photo hold duration control to vary the pacing — longer holds for your hero images creates a rhythmic quality that makes the strongest images more memorable.
Show what your dark sky sessions really look like
Import your GoPro Night Lapse footage and Nikon Milky Way stills. Automatic EXIF sync builds the timeline — free during the beta.
Download on App Store — FreeFrequently Asked Questions
Can a GoPro capture useful footage in complete darkness at an astrophotography location?
A GoPro Hero 13 in Night mode can capture ambient darkness and headlamp-lit footage reasonably well in Night Lapse mode, even at very dark sites. The GoPro will not show the night sky in the way your main camera does — use Night Lapse mode so the long per-frame shutter speed accumulates enough light for legible footage. Your Nikon stills provide the actual sky images as overlays.
My astrophotography exposures are 20-25 seconds — how does POV Syncer handle those timestamps?
POV Syncer uses the EXIF DateTimeOriginal field, which records when the shutter opened. For a 25-second exposure, the timestamp marks the start of that exposure. POV Syncer places the image at that exact moment in your footage — accurate to the second the shutter opened. The exposure duration itself is not relevant to the matching; only the start timestamp matters.
Can I use POV Syncer for star trail photography?
Yes — star trail stacks are images like any other. Import your final processed star trail stack with a timestamp corresponding to the start of the stacking sequence. POV Syncer places it at that moment in your footage. Use the per-video timing offset to fine-tune the placement if the stack's timestamp is slightly off from the start of the sequence.
Conclusion: Every Dark Sky Session Deserves a Proper Story
Astrophotography represents some of the most extraordinary photographic results achievable with modern equipment — and some of the most extraordinary effort to produce them. A night session at a dark sky site, with the preparation, the cold, the waiting, and the 2am revelation of a Milky Way image that worked exactly as planned, is a story that deserves to be told in full.
POV Syncer makes it possible to tell that story — from the Night Lapse GoPro footage of the session to the Nikon Milky Way images appearing as overlays at their precise moments — without the three to four hours of manual timeline editing that previously made BTS content unsustainable for solo astrophotographers. Import, review, process, polish, export. Every dark sky session becomes content worth sharing.
For more on the workflow, read the EXIF timestamps explained guide for detail on how the matching cascade handles different camera systems, and the street photography POV process guide for the broader context of the workflow.
Ready to document your next dark sky session?
Download POV Syncer free on TestFlight. Import your Night Lapse footage and Milky Way stills — automatic EXIF sync builds the timeline in under 60 seconds.
Join 1,000+ photographers getting weekly tips. Unsubscribe anytime.