The film photography revival is real and accelerating. In 2026, the Pentax 17 — Pentax's newly launched 35mm half-frame compact — is generating waiting lists. Film stocks from Kodak, Fujifilm, Ilford, and Cinestill are selling out before arrival. Darkrooms that closed a decade ago are reopening. The community of people shooting film in 2026 is larger, younger, and more socially active than it has been in twenty years.
What drives this revival is partly aesthetic (the grain, the colour rendering, the specific look of different emulsions) and partly about process. Shooting 36 frames with intention. The discipline of a fixed ISO. The weeks-long arc from shutter press to developed print. Film photographers have a richer, more deliberate process story to tell than digital photographers — and a POV video format that shows that story is a natural fit for the community.
The twist, of course, is that film cameras have no EXIF. They write no timestamp. So how do you sync scanned film images to POV footage? The answer requires a slightly different workflow — but POV Syncer handles it, and the results are genuinely compelling.
What Are Film Photography POV Videos?
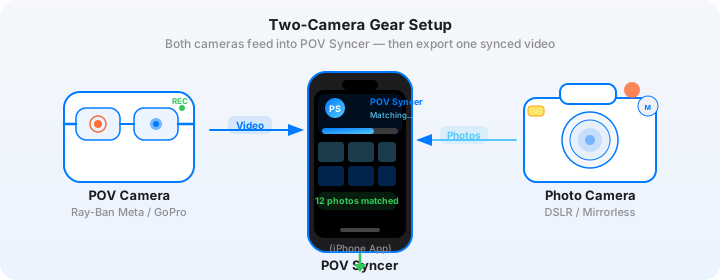
A film photography POV video is a first-person recording of your shooting session, with your scanned film images appearing as overlays at (or near) the moments you captured them. The POV camera records your perspective as you walk and shoot — raising the Leica to your eye, advancing the film, reacting to a scene. Your scanned negatives provide the images that reveal themselves on the timeline.
The workflow is slightly different from digital POV video because film cameras produce no EXIF timestamps during the shoot. The sync happens at scanning time — you assign timestamps to your scanned images that correspond to the approximate shooting time, and POV Syncer uses those to place the images on the POV video timeline. The matching is not to-the-second precise (which is fine — a few seconds' imprecision in placement is imperceptible in the finished video), but it tells the story correctly: this shot happened here in the walk, not there.
The format suits the film photography community particularly well because of what it shows: the care, intentionality, and unhurried process of analog shooting. A digital photographer might fire 500 frames in an hour; a film photographer fires 36 with the knowledge that every frame costs real money and real development time. That intentionality is visible in a POV video — and it is compelling to watch.
Why Film Photographers Should Make POV Videos
Film photography has a natural audience for process content. The community spans YouTube channels dedicated to gear reviews and shooting sessions, Instagram accounts with hundreds of thousands of followers for film-look aesthetics, and TikTok creators who have found that "shooting film on the street" content generates enormous engagement across audiences who do not shoot at all.
- The reveal moment — "this is what the Leica captured from this moment in the footage" is a uniquely satisfying reveal for film photography content, because the image quality and aesthetic is immediately distinguishable from the GoPro footage
- The full-arc story — a POV video can be the first chapter of a longer story that includes the darkroom, the contact sheet, the final print. The BTS video grounds all the subsequent process content in a specific shooting session
- Intentionality made visible — film photographers can narrate why they chose each shot — "I had four frames left on the roll when I saw this light, and I knew this was the one to spend two frames on" — creating content that is genuinely educational about the analog mindset
- Teaching the discipline — for photographers who are curious about switching to film, a POV video that shows the shooting experience in real time is the most effective format for communicating what film photography actually feels like
Get the free POV Photography Cheat Sheet
Camera settings, EXIF workflow tips, and export presets for GoPro, Ray-Ban Meta, DJI Action, and Insta360 — including a dedicated section on the film photography scanning workflow.
Free PDF, no spam. Unsubscribe anytime.
Pick Your POV Rig for Film Photography
Film camera bodies tend to be more discreet than modern DSLRs and mirrorless cameras — one of their practical advantages on the street. Your POV camera choice should complement rather than undercut that discretion.
Smart Glasses: Ray-Ban Meta Gen 2
The Ray-Ban Meta Gen 2 is the most discreet POV capture option for film street photography. You look like someone wearing sunglasses. Nothing about the setup draws attention. For street photographers who value the low-profile approach that a Leica M6 or Ricoh GR offers, adding a chest mount GoPro defeats part of the purpose. The Ray-Ban Meta preserves the discretion while capturing the session in wearable 1080p video.
The perspective is eye-level and natural, which suits the street photography aesthetic well. The colour rendering is warm and consistent with the kind of light film photographers gravitate toward — golden hours, shade, overcast days.
Chest Mount: GoPro Hero 13
For film photographers who do not mind a slightly more visible rig, a chest-mounted GoPro Hero 13 gives the best footage quality and stabilisation. HyperSmooth 6.0 handles the walking movement of a street session, and the resulting footage has a cinematic quality that suits the deliberate, unhurried pace of film street photography. The wider field of view also captures more environmental context — useful when the story you are telling is about a specific location and its atmosphere.
Hot-Shoe Mount for Rangefinder Cameras
A small action camera (Insta360 GO 3S works well here) mounted on the hot shoe of your Leica or other rangefinder gives a uniquely film-authentic perspective — the viewfinder, the top of the camera, and the scene ahead simultaneously visible in the frame. This is the "this is what it looks like to shoot a Leica" perspective that the film photography community specifically finds compelling.
360-Camera for Location Flexibility
An Insta360 X4 chest-mounted gives maximum post-production flexibility. For film photographers who shoot in one location for a full roll, you can reframe the footage after the fact to show the best angles — the approach to a scene, the shooting moment, the environmental context — without committing to a single perspective during the shoot.
The Gear: What Film Street Photographers Use
Film Camera: Leica M6, Pentax 17, or Ricoh GR21
The cameras dominating film street photography in 2026 have changed slightly from even two years ago. The Pentax 17, Pentax's half-frame 35mm compact with a genuinely sharp lens and a lovely optical viewfinder, is generating significant interest for its balance of image quality and compact format. The Leica M6 remains the standard rangefinder choice for photographers who want maximum control and a camera that is built to last a century. The Ricoh GR21 continues to be a cult choice for the street photography community — wide angle, sharp, compact, with a character that renders street scenes unlike any other camera.
Film choices that matter for this format:
- Kodak Portra 400 — the most forgiving and colour-accurate colour negative film, scans beautifully, and handles mixed natural and artificial light gracefully. The warm rendering contrasts well with GoPro's more neutral footage colour.
- Ilford HP5 Plus 400 — the black-and-white all-rounder. Grainy when pushed, clean when exposed correctly. The monochrome scan overlay on colour GoPro footage creates a striking visual contrast.
- Kodak Gold 200 — affordable, widely available, and characteristically warm-toned. For photographers who shoot in good natural light and want a lower-cost emulsion without sacrificing too much quality.
- Cinestill 800T — for low-light and night street photography. The halation effect around light sources is distinctive and cinematic. POV footage at night with Cinestill scan overlays creates content that feels genuinely distinctive.
The Critical Difference: The Film Scanning Workflow
This is the piece that makes film photography POV videos different from digital — and it requires a specific approach to get right.
The Problem: Film Has No EXIF
A Leica M6 does not write any digital metadata. Neither does a Pentax 17, a Ricoh GR21, or any other analog camera. The JPEG or TIFF files you get from scanning your negatives will have an EXIF DateTimeOriginal field — but it will be set to the time of scanning, not the time of shooting. If you shoot in March and scan in April, your scanned images will have April timestamps.
This is the workflow challenge. POV Syncer's matching system reads EXIF timestamps — so if your scanned images have incorrect timestamps, the matching will be incorrect.
The Solutions
There are several approaches to solving this, and which one you use depends on your scanning workflow and how much precision you need:
Option 1: Scan same-day. If you develop and scan your film on the same day as the shoot (home development with a Paterson tank is a one-hour process), and you scan immediately after drying, your scan timestamps will be only a few hours after the shoot. Use POV Syncer's per-video timing offset to apply the gap between shooting and scanning (e.g., "subtract 4 hours" if you shot in the morning and scanned in the afternoon).
Option 2: Use the timing offset systematically. If you scan weeks or months after the shoot, apply a per-video timing offset equal to the time difference between your POV footage and your scan timestamps. POV Syncer's timing offset is per-clip and is applied as a simple addition or subtraction to all timestamps in that clip.
Option 3: Photograph a timestamp reference frame. Before loading the roll, take a single frame of your phone screen showing the current time (using a digital camera or your iPhone). Include this reference shot in your roll. When you scan, you know exactly which frame corresponds to which time, and you can set offsets accordingly.
Option 4: Scan with timestamp-aware software. Several smartphone scanning apps (DSLR Digitizer, Lomo Ripple) allow you to set the DateTimeOriginal EXIF field manually when scanning each frame, or to use the phone's clock as the scan timestamp. If you scan a roll in one continuous session and the scan timestamps are sequential and timed, the offset approach becomes very clean.
Try the workflow — free on TestFlightStep-by-Step: Building Your Film Photography BTS Video
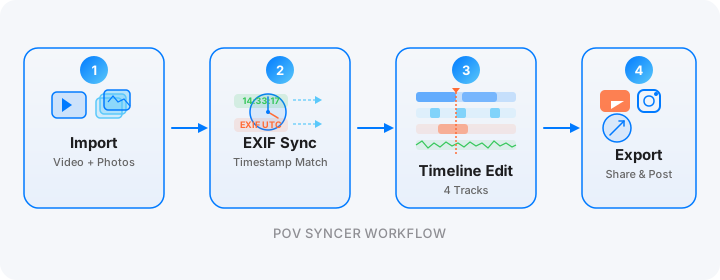
Step 1: Import. Transfer your Ray-Ban Meta or GoPro footage to your iPhone. Import your scanned film images. Create a new project in POV Syncer and import both. If your scan timestamps are correct (same-day scanning) or you are using the offset approach, proceed directly to the match preview. POV Syncer handles up to 2,000 items per project — a full 36-frame roll plus session footage fits comfortably.
Step 2: Review the match preview. The match preview will show you how well the timestamps align. If your scans are same-day, you should see reasonable matching. If you are applying an offset, this is where you check whether the offset value is correct — the scanned images should cluster at the active shooting moments in the footage, not distributed randomly. The match preview tutorial explains how to interpret the display and adjust your offset value iteratively.

Step 3: Process. Once you are happy with the match preview, tap Process. All rendering happens on-device.

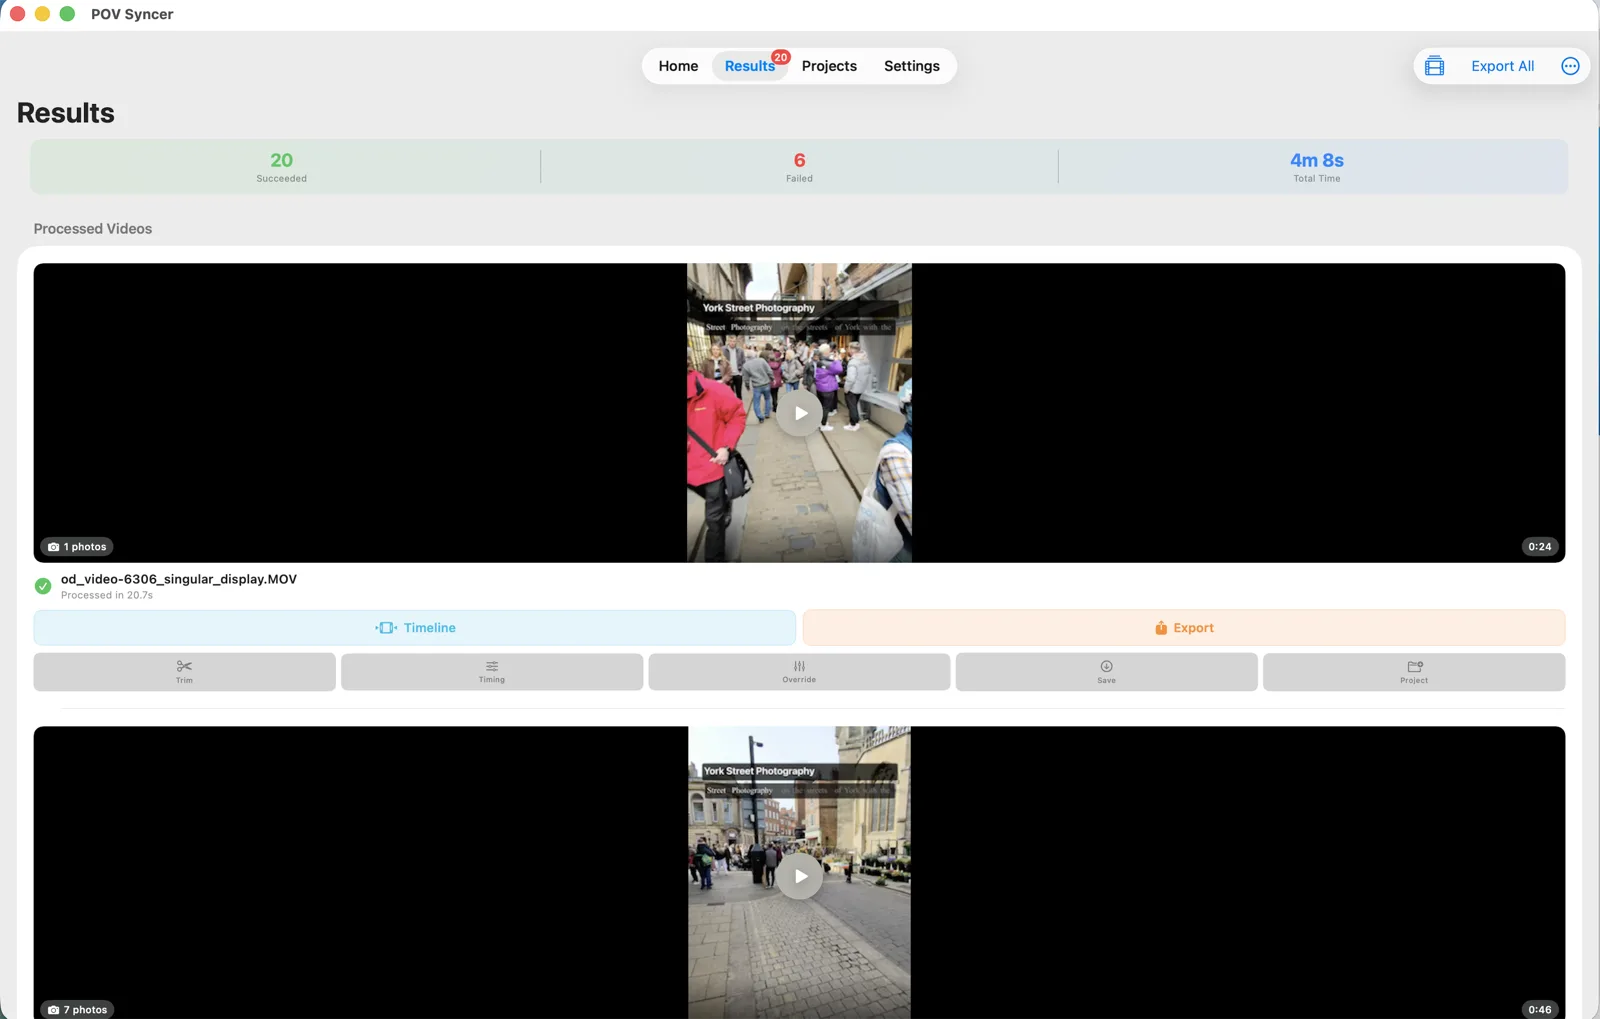
Step 4: Review results and open the timeline. The results view shows your populated timeline. For a 36-frame roll of Kodak Portra, you might have 15-20 selected scans distributed across a one-hour session. The timeline shows these as clusters at the active shooting moments, with longer gaps between them that represent walking and waiting between shots.


Step 5: Add film-specific titles and narration. For film photography content, the titles track is where you add context that the community loves: film stock name, camera, location, date, roll number. "Kodak Portra 400 — Leica M6 — Brick Lane, London — March 2026" is the annotation that signals to a film photography audience that you know what you are doing and care about the details. Use AI narration to explain why you chose a particular exposure, or what you were looking for in a specific moment.
Step 6: Export. Export 16:9 for YouTube at 1080p — film photography YouTube content tends to be more editorial and long-form, so a 5-8 minute session walkthrough with narration works well. For Instagram Reels, export a 60-90 second cut with the three or four strongest reveal moments. Both formats export from the same POV Syncer project.
Works on iPhone, iPad, and Apple Silicon Mac
POV Syncer runs on all three platforms. For film photographers who scan with a dedicated flatbed scanner connected to a Mac (Epson Perfection v600 is the standard prosumer recommendation), the Mac version of POV Syncer is the natural editing home. Import your scans directly from the scanner software output folder, import your session footage, and work in the full-screen timeline editor.
Under the Hood: EXIF Sync for Film Photography
POV Syncer's matching relies on EXIF timestamps, and the film photography workflow requires a slightly different approach to producing those timestamps than digital shooting. Here is the full picture:
- Four-strategy cascade — GPS UTC → OffsetTimeOriginal → GPS-corrected timezone → device timezone fallback. For film scans, the OffsetTimeOriginal strategy is the most relevant: if your scan software sets a timezone-aware timestamp, POV Syncer uses the UTC-corrected version for matching
- Per-video timing offset — the key control for film photography workflows. Apply a systematic time adjustment to your scanned images to align scan timestamps with shoot timestamps. Can be adjusted iteratively in the match preview screen until the visual distribution makes sense
- Adjustable match tolerance — for film photography where the timestamp accuracy is lower than digital, a wider tolerance (10-30 seconds) is appropriate. This allows the matching to catch frames that are close to the right moment without false negatives
- 100-photo cap per clip, spread evenly — useful for film photographers: a 36-frame roll fits comfortably within this cap, but a three-roll day session might benefit from splitting into multiple clips by roll
- Save and reload projects — film photographers often revisit their scanning workflow; save the project after setting your offset and return to it when you have finished scanning all rolls from a session
Film Photography-Specific Tips
Write a Shoot Log
The most practical approach for accurate film POV sync is a simple shoot log — a note on your phone recording the approximate time of each roll start ("Roll 2 started: 11:32am"). This gives you an anchor point for each roll's timing offset, making the POV Syncer alignment much more accurate than working from scanner timestamps alone.
Use Your Phone's Clock as a Shutter-Adjacent Reference
At the start of each roll, photograph your phone screen showing the current time with a digital camera, then load the film. The gap between the reference timestamp and the first film frame gives you an accurate offset anchor for the entire roll.
Keep the GoPro Running Continuously
Unlike digital photography where the session has obvious start and end points tied to a camera's clock, film sessions are harder to segment. Run your GoPro or Ray-Ban Meta footage continuously for the full session rather than stopping and starting — this gives you one long clip that covers the whole roll, making the offset calculation simpler and more reliable.
Make the Film Aesthetic Visible
In the timeline editor, resist the temptation to use the same font and presentation style you would use for a digital photography POV video. For film content, choose a serif or vintage-styled typeface from POV Syncer's 15 fonts, and use title overlays that mention the specific emulsion. The aesthetic of the presentation should signal "this is a film photography video" before a single scan appears.
Narrate the Film-Specific Decisions
Film photography decisions are different from digital ones — and therefore more interesting to a general photography audience. "I had 6 frames left on the roll at this point, so I was being selective" is the kind of narration that only film photographers can offer. Use POV Syncer's AI narration or record your own voiceover to make these analog-specific considerations explicit.
Start showing the full analog process
Import your Ray-Ban Meta or GoPro footage and your scanned film images. POV Syncer's timing offset workflow makes film photography POV videos possible — free during the beta.
Download on App Store — FreeFrequently Asked Questions
Film cameras don't have EXIF — how does POV Syncer sync the images?
POV Syncer uses the EXIF timestamp on your scanned image files. When you scan developed film, the scanner software sets a DateTimeOriginal field. You then use POV Syncer's per-video timing offset to apply the difference between scan time and shoot time, aligning your scanned images with the POV footage timeline. It is a two-step process, but once you understand the offset approach it takes only a minute to set up correctly.
Can I use POV Syncer if I scan film weeks after the shoot?
Yes — use the per-video timing offset to apply a global time correction. If you shot on 15 March and scanned on 1 April, the offset is approximately 17 days. Apply that offset, review the match preview to verify the distribution looks correct, and process. The per-video offset is saved with the project, so if you come back to add more scans later, the setting is preserved.
What is the best app for scanning film to get useful EXIF timestamps?
The DSLR Digitizer and Lomo Ripple apps both allow you to timestamp scans using your iPhone's clock as you scan. For most film photographers, scanning while reviewing session notes and setting approximate shot times gives adequate accuracy for POV Syncer's matching to work correctly — the visual match preview makes it easy to see if the offset is right before you commit to processing.
Conclusion: The Full Story From Roll to Scan
Film photography has a story that no other photographic practice can tell: the deliberate arc from loading a roll of Portra 400 to holding a developed scan and recognising the image you committed to three weeks ago. A POV video that shows the shooting session, with the resulting analog frames appearing at their approximate moments, tells that story in a format that the film photography community — and a much wider audience — finds genuinely compelling.
The workflow requires a small amount of extra preparation around the scanning timestamp approach. But once that is understood, what was previously an impossible editing challenge (film cameras produce no EXIF — how do you sync them?) becomes manageable in under 60 seconds. Import, offset, match preview, process, polish, export.
For more on the broader POV video workflow, read the street photography POV video process guide and the EXIF timestamps explained guide which covers the four-strategy matching cascade in detail.
Ready to show your analog process?
Download POV Syncer free on TestFlight. Import your session footage and scanned film images, apply your timing offset, and see the BTS video build itself.
Join 1,000+ photographers getting weekly tips. Unsubscribe anytime.