The catch? Until recently, turning that iPhone footage plus your Ricoh GR IIIx or Fujifilm X100VI stills into an actual behind-the-shot video meant hours of scrubbing: find the shot in the footage, note the timecode, drag the photo to that position, nudge it, repeat forty times. Three hours of manual editing for a 90-second Reel. POV Syncer does that matching automatically — reading the EXIF timestamps from your stills and placing each photo at its exact moment in the iPhone footage in under 60 seconds.
This guide covers the full setup: how to mount your iPhone so the footage is actually watchable, which stills cameras pair best with iPhone POV, the settings that make EXIF sync reliable, and the exact steps inside POV Syncer. No action cam needed.
What Are iPhone Street Photography POV Videos?
A street photography POV video is the behind-the-shot format: continuous first-person footage from the photographer's perspective, with the resulting still photographs embedded at the precise moments the shutter was pressed. Viewers watch you navigate the street, sense a moment building, raise your camera — then the finished photograph appears, overlaid on the footage at exactly the right second.
The format works because it answers the question every photography viewer silently asks: what was actually happening when you took that? You can't answer that with a caption. You can answer it with 30 seconds of first-person video followed by the photograph itself.
In 2026, the iPhone POV variant has become the most accessible version of this format — because everyone already has the device, mounting hardware costs almost nothing, and the footage quality from iPhone 16 Pro is genuinely excellent. The Cinematic mode stabilisation makes walking footage watchable. The ultra-wide camera at 13mm gives you broad environmental context. And crucially: iPhone video records GPS-embedded UTC timestamps that POV Syncer can read directly — making EXIF matching more reliable than with many action cameras.
Why POV Videos Help Street Photographers Grow
Instagram Reels and YouTube Shorts reward content with a clear narrative arc — beginning, middle, payoff. The behind-the-shot format has that built in: the approach builds anticipation, the shutter moment is the climax, the photograph is the resolution. Retention rates for this format are consistently higher than static image slideshows.
But growth is only part of it. There are three deeper reasons to shoot behind-the-shot video:
- Relive the session. Watching your own footage back is genuinely instructive. You see things you missed in the moment — how you position yourself, when you hesitate, which compositions you abandoned.
- Teach while you shoot. A behind-the-shot video with a 15-second voiceover explaining what you saw is more educational than any written tutorial. Your audience learns your approach, not just your outcome.
- Build trust and connection. Followers who've watched you work in real time feel genuinely connected to your photography. They're not just fans of the images — they understand how those images come to exist.
Pick Your iPhone Mount: Four Options
Chest Harness Mount (Recommended)
A chest harness with a universal phone clamp is the most stable option for walking-heavy street photography. The camera sits at mid-chest height — slightly lower than eye level, which gives a natural perspective that doesn't feel artificially elevated. At this height, the footage shows the environment you're walking through, the people around you, and — crucially — the moment you raise your dedicated camera to shoot.
Look for a harness with adjustable straps and a cold-shoe style clamp that grips the iPhone securely. You don't want the phone shifting between clips. The total cost is typically under £20. Ulanzi and SmallRig both make reliable models compatible with standard iPhone cases.
Neck Lanyard Mount
A neck lanyard or neck brace mount positions the iPhone just below chin height — closer to true eye level than a chest mount. This gives footage that more closely matches what you're actually looking at, which makes the correlation between the footage and the resulting photograph more obvious. The trade-off is that chin-height mounting can pick up more bobbing motion when you walk quickly.
Camera Strap Hot-Shoe Clamp
If you're shooting with a camera that has a hot shoe (Fujifilm X100VI, Sony RX100 VII), you can mount your iPhone directly on top using a cold-shoe phone clamp. This gives you a genuinely on-camera perspective — the iPhone sees almost exactly what your stills camera's viewfinder is pointing at. The downside is extra weight on your camera neck strap, which gets tiring after a few hours.
Belt Clip or Jacket Pocket
For truly inconspicuous shooting, clip the iPhone to your belt or tuck it in a breast pocket with the lens just peeking over the edge. The footage won't be as steady as a harness mount, but for photographers who want complete invisibility on the street, the lower-profile setup is worth the trade-off.
The Gear: iPhone + Stills Camera Combinations
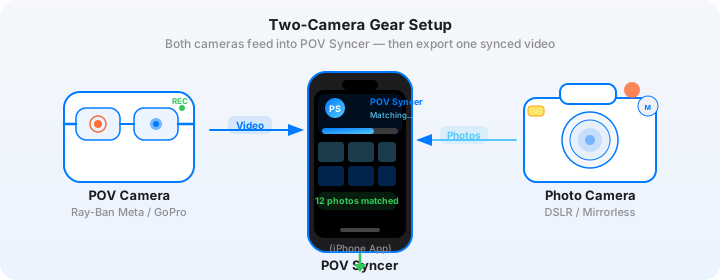
Your iPhone handles the POV video. Your dedicated camera handles the decisive moments. Here's how the best current stills cameras pair with iPhone POV footage.
iPhone 16 Pro + Ricoh GR IIIx
This is the definitive minimal kit for street photography behind-the-shot content. The Ricoh GR IIIx fits in a jacket pocket, shoots at 40mm f/2.8 (a natural street focal length), and has snap-focus at 1.2m for rapid deployment. Most importantly for this workflow: the GR IIIx records complete EXIF data including OffsetTimeOriginal — the UTC offset field that POV Syncer's second matching strategy reads directly for sub-second accuracy. Set the UTC offset correctly before every session.
Settings for the GR IIIx: JPEG Fine, positive film simulation, snap focus at 1.5m or 2m, ISO Auto 100–3200, minimum shutter 1/500s. Leave shutter sound on — the audible click in the iPhone audio gives you a secondary sync reference if you ever need to verify EXIF accuracy.
iPhone 16 Pro + Fujifilm X100VI
The Fujifilm X100VI at 23mm (35mm equivalent) gives you a wider street perspective than the GR IIIx. The X100VI's EXIF data includes GPS location when you enable Location Sync via the Fujifilm XApp — which activates POV Syncer's most reliable matching strategy (GPS UTC). Pair with Classic Chrome or Acros film simulation for a consistent look across a session.
iPhone 16 Pro + Leica Q3
If you're shooting with a Leica Q3, your POV footage needs to complement that quality — and iPhone 16 Pro's ProRes LOG recording absolutely can. The Q3's 28mm f/1.7 gives you images that the iPhone footage contextualises beautifully. Set the Q3 to record GPS (it has a built-in GPS chip) for the most reliable EXIF sync.
iPhone 16 Pro Shooting Everything
Some minimalists shoot both roles with the iPhone itself: front camera for POV, rear camera for stills. This works, but you lose the EXIF sync advantage — both files share the same device clock, but the timestamps for video and photo are the same device's time, so any drift is zero. The matching is perfect, but you lose the image quality differential that makes the format compelling. The point of the format is the contrast between immersive, continuous video and the precise, intentional stillness of a dedicated camera's output.
The Hard Part — and How POV Syncer Fixes It
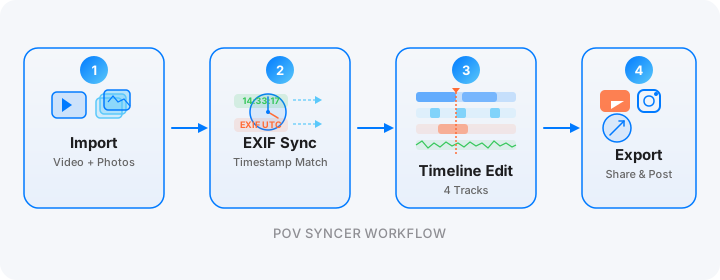
Let's be honest about what the manual version of this workflow looks like. You finish a two-hour street session. You've taken 45 photographs. Each one needs to be placed at exactly the right moment in the iPhone footage. Finding each moment means scrubbing the timeline, identifying the footage position, noting the timecode, then placing and trimming the photo. Call it 3 to 5 minutes per photo. That's two and a half hours of editing for a 90-second Reel. Most photographers either never bother creating this content, or they burn out after doing it three times.
POV Syncer replaces that entire scrubbing process with automatic EXIF matching. Here's exactly how it works:
Step 1: Import Your Media
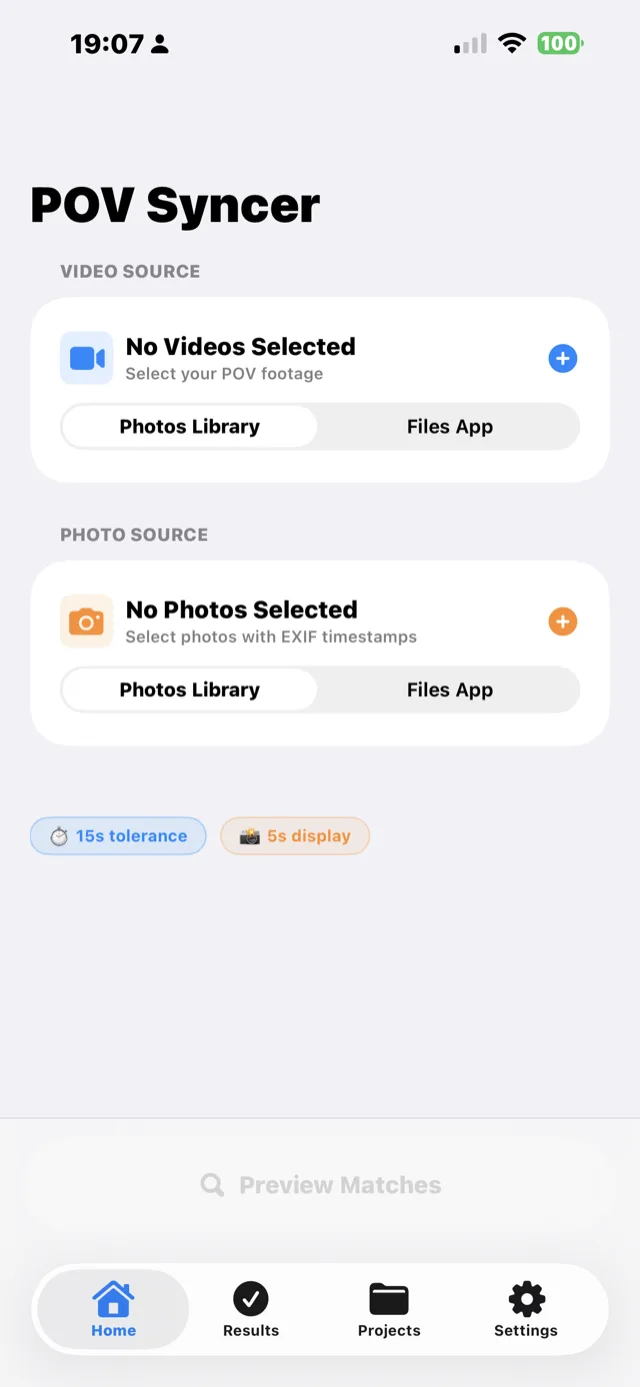
Open POV Syncer and create a new project. Import your iPhone video clips — you can add up to 2,000 photos and video files per project, and POV Syncer handles multi-clip sessions natively. Import your stills from the GR IIIx or X100VI via the Files app or direct from your camera roll.
Step 2: EXIF Match Preview
POV Syncer runs four matching strategies in sequence — GPS UTC timestamp, OffsetTimeOriginal EXIF field, GPS-corrected timezone inference, and device timezone fallback. For an iPhone video paired with a GR IIIx that has UTC offset set, the first two strategies typically give you sub-second accuracy. The Match Preview screen shows you each photo positioned against the corresponding frame of footage so you can verify the placement before processing.

Step 3: Process

Tap Process. POV Syncer composites your photos into the iPhone footage at their exact timestamps. The whole process takes seconds for a typical session. Everything runs on-device — your footage and photographs never leave your phone.
Step 4: Review Results

Step 5: Polish on the Timeline

The timeline editor gives you a multi-track workspace: video base track, photo overlay track, titles and text, AI voice narration, music, and effects. Add a 10-second narration using one of the six Azure neural AI voices — Sonia or Ryan for British English, Jenny or Guy for American, Natasha or William for Australian. The narration reuses from your Voice Library once you've recorded or generated it once. Add a title track using any of the 15 premium fonts. Trim, reorder, adjust hold times on the photos.
Step 6: Export
Export at 9:16 for Reels and Shorts, or 1:1 for Instagram grid posts. POV Syncer's batch process and Export All to Photos feature lets you process multiple projects at once — useful if you're creating a series of behind-the-shot videos from the same session.
Try it now — free during beta
Import your iPhone footage and your stills. POV Syncer matches them in seconds using EXIF timestamps. No manual scrubbing, no timeline drag-and-drop.
Download POV Syncer FreeWorks on iPhone, iPad, and Mac
POV Syncer runs natively on iPhone, iPad, and Apple Silicon Mac. On iPhone it's the quickest path from shoot to export — import via the Files app, match, and export without leaving your phone. On iPad the larger screen makes the timeline editor significantly easier to use — you can see all tracks simultaneously and drag photo positions more precisely. On a Mac you get the full desktop experience: drag in files from Finder, use the keyboard for precision editing, and batch export multiple projects at once.
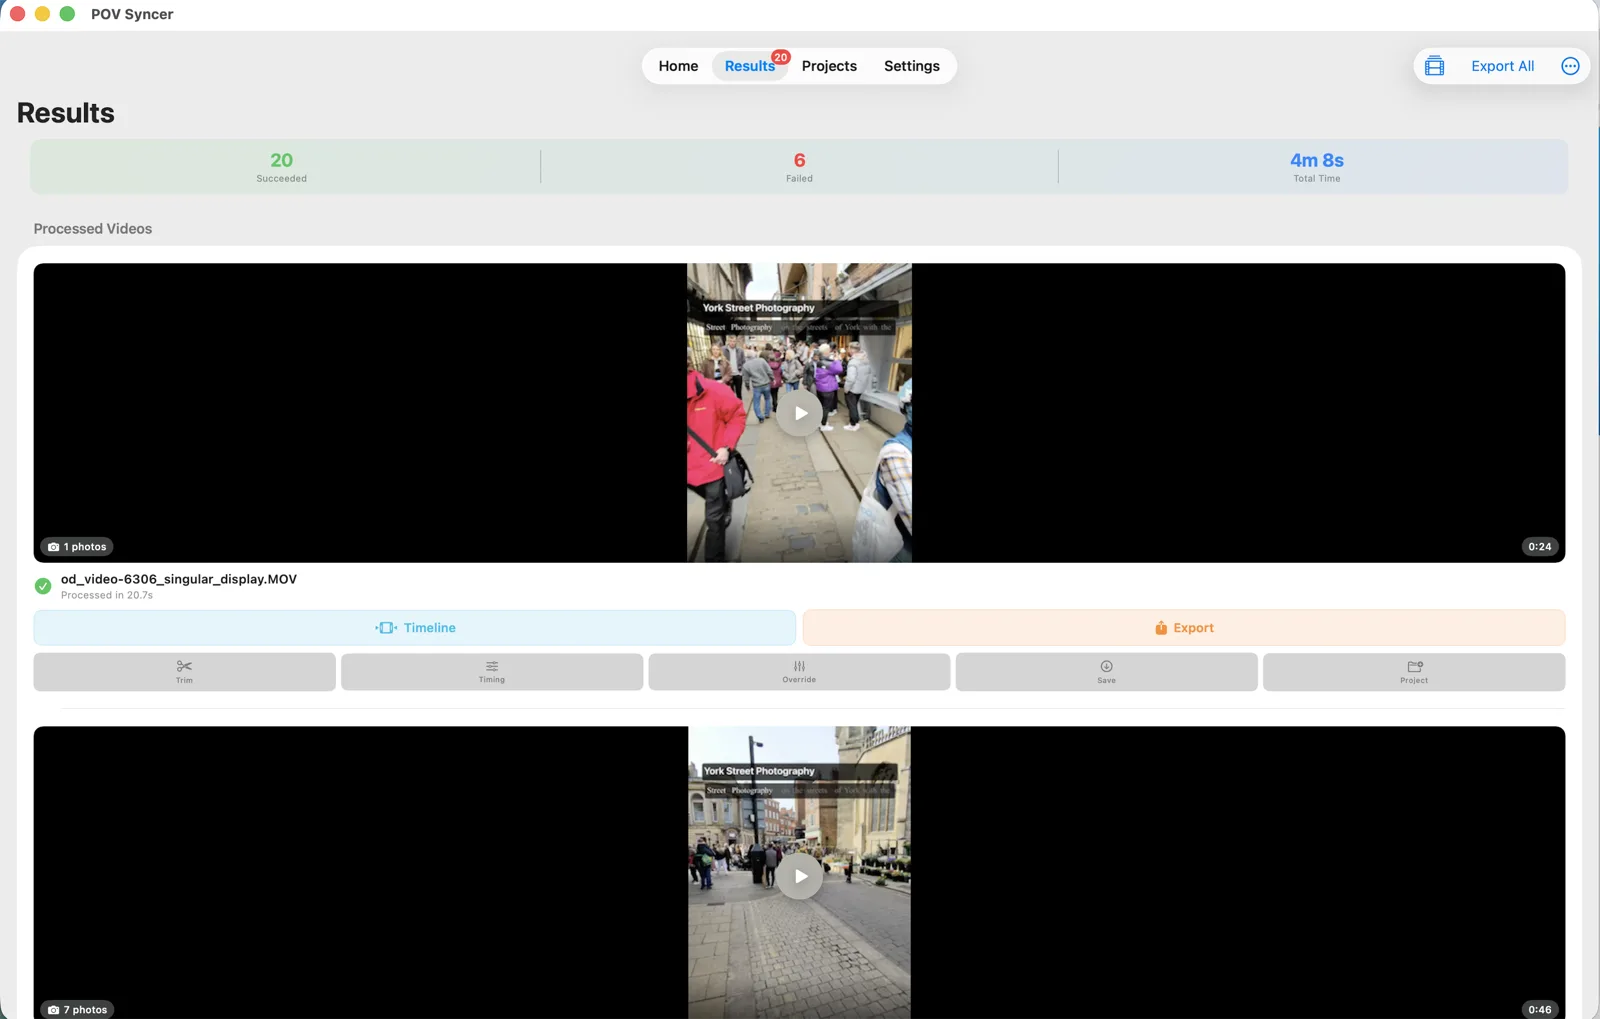
On iPad (with an external keyboard and mouse or Apple Pencil), the timeline editor is particularly powerful for multi-clip sessions where you've shot across several streets or locations in a single day.
Under the Hood: How POV Syncer Nails the Timing
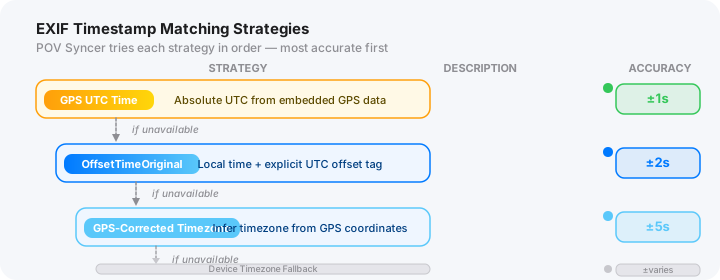
The matching engine uses four strategies in sequence:
- GPS UTC timestamp — iPhone video metadata includes GPS UTC. If your stills camera also records GPS (Fujifilm X100VI with Location Sync, Leica Q3), this gives you millisecond-level accuracy.
- OffsetTimeOriginal EXIF field — Ricoh GR IIIx and most modern cameras write a UTC offset into the EXIF. POV Syncer reads this and converts to UTC for matching.
- GPS-corrected timezone inference — If GPS coordinates exist but no UTC offset, POV Syncer infers the timezone from the GPS location data.
- Device timezone fallback — Uses the device's local timezone as a last resort. Reliable enough for cameras set to local time with no UTC offset recorded.
Additional controls: adjustable match tolerance (tighten it to ±1 second for decisive-moment photography; widen it if you know your clocks drifted); per-video timing offset to correct systematic drift; and a 100-photo-per-clip cap that spreads photos evenly if you've imported a huge batch. The entire process runs on-device — only AI voice synthesis uses the internet, and only when you explicitly request it.
Six Tips for Better iPhone Street Photography POV Videos
1. Sync Your Clocks Before Every Session
The most important preparation step. Check your stills camera clock against your iPhone. For the GR IIIx, go to Settings → Date/Time and compare to your iPhone's clock. A 2-second offset shifts every photograph 2 seconds away from the correct footage moment — in decisive-moment street photography, 2 seconds is the difference between the peak action and an empty frame.
2. Shoot a Clock Photo at the Start
Take a photo of your iPhone's lock screen showing the time. The EXIF timestamp of this test photo tells you exactly what your stills camera thinks the time is. Compare it to the actual time. If there's a 4-second discrepancy, use POV Syncer's per-video timing offset to correct it across the whole clip.
3. Record Continuous Clips, Not Short Bursts
One continuous iPhone clip per location or street segment makes the EXIF matching work better than dozens of short clips. POV Syncer handles multiple clips, but each clip boundary requires the matching engine to stitch the timeline — one long clip per session is simpler to work with.
4. Enable Location Sync on Fujifilm Cameras
If you're shooting with a Fujifilm X100VI or X-T5, enable the Fujifilm XApp location sync feature. This writes GPS coordinates into every EXIF file, activating POV Syncer's most precise matching strategy. The GPS coordinates also become useful metadata for searching your archive later.
5. Use iPhone Cinematic Mode for Key Moments
For sequences where you want the depth-of-field effect in the POV footage itself — walking through a shallow-depth-of-field scene, for example — switch to iPhone's Cinematic mode briefly. You can mix standard and Cinematic clips within the same POV Syncer project.
6. Keep the Narration Short
AI narration works best as a single sentence that plays during the approach — before the photograph appears. Something like: "I'd been watching this corner for twenty minutes, waiting for the light to hit the building at the right angle." That's it. Let the photograph explain the rest. If you add narration over the photo itself, you're competing with the image for the viewer's attention.
What the Finished Video Looks Like
Here's a concrete example. You've spent two hours in Borough Market on a Saturday morning. You've taken 38 photographs. You import the iPhone chest-mount footage and the GR IIIx JPEGs into POV Syncer. Matching takes about 8 seconds. You review the placements — 35 of the 38 are spot-on, 3 need a small nudge because the GR IIIx clock drifted slightly. You adjust using the per-video offset. Total time so far: 4 minutes.
You select the 3 best moments — a fish stall vendor mid-pour, a child's hands reaching for a sample, a shaft of light across the cheese counter. You trim the footage around each moment, keeping about 15 seconds before and 5 seconds after each photograph. You add a single narration segment using Sonia (UK neural voice): "Saturday morning, Borough Market. I've been waiting for this exact shaft of light for twenty minutes." The narration plays during the approach. The photo reveals itself silently.
Total editing time: 18 minutes for a 42-second Reel. Compare that to 3 hours of manual scrubbing for the same result.
Create your first iPhone POV video
POV Syncer is free during the beta. Mount your iPhone, shoot your session, import both files. Automatic EXIF matching does what used to take hours — in seconds.
Download POV Syncer FreeFrequently Asked Questions
Can I use my iPhone as a POV camera without buying a GoPro?
Yes. A chest harness or neck mount costing under £20 turns your iPhone into a capable POV camera. iPhone 16 Pro's 4K stabilised footage is excellent for this purpose, and its GPS UTC timestamps make EXIF matching in POV Syncer highly accurate.
Does iPhone video sync reliably with a Ricoh GR IIIx?
Yes, as long as the GR IIIx UTC offset is set correctly. iPhone video includes GPS UTC timestamps; the GR IIIx writes OffsetTimeOriginal EXIF data. POV Syncer uses both — GPS UTC on the video side, OffsetTimeOriginal on the stills side — for sub-second matching accuracy.
What iPhone mount works best for street photography?
A chest harness mount is the most stable option for walking-heavy sessions. A neck lanyard mount gives a slightly higher perspective closer to eye level. The hot-shoe mount on your stills camera gives the most camera-matched perspective but adds weight.
Is POV Syncer free?
Everything is free during the beta period. Download via TestFlight at povsyncer.com.