Macro photography produces images that genuinely stop people. A spider's eyes in perfect 1:1 detail. A dewdrop refracting an entire landscape. The geometry of a fly's compound eye. These images have enormous stopping power on social media because they show something the viewer knows exists but has never seen clearly. The reaction is almost universal: "I had no idea."
What is less understood is how much physical work goes into getting these images. The photographer is on the ground, or crouched at an awkward angle, or lying prone in a meadow — holding a position for minutes at a time, millimetres from their subject, fighting every vibration their body produces. A POV behind-the-scenes video of a macro session shows this process in a way that dramatically changes how viewers understand the images.
The problem has always been that creating that BTS video required manual editing work that could add three hours to a session day. POV Syncer eliminates that entirely — reading the EXIF timestamps from your stills camera files and placing every macro shot at its precise moment in your POV footage, automatically, in under 60 seconds.
What Are Macro Photography POV Videos?
A macro photography POV video is a first-person recording of your field session, with your finished close-up images appearing as overlays at the moments you captured them. The POV camera captures your physical perspective as you work — approaching a subject, positioning your lens, adjusting your stance, working through the shallow depth of field challenges that define macro shooting. Your stills camera produces the images that appear as overlays, transforming the process video into a story with a visual payoff.
For macro photography specifically, the format has a unique power: the contrast between the wide POV perspective (a person crouching in a garden, apparently pointing their camera at nothing in particular) and the revealed close-up image (a perfectly exposed stag beetle in extraordinary detail) creates a genuine moment of revelation each time a photo overlay appears. It is a reveal format that plays perfectly to social media's attention mechanics.
These videos work well across YouTube (longer educational breakdowns with narrated technical explanation), Instagram Reels (short reveal-focused cuts), and TikTok (the reveal moment is a natural hook for a 30-second format). Macro photography content also attracts a dual audience: nature and photography enthusiasts who both find the process compelling.
Why Macro Photographers Need This Format
The macro photography community is an active one — across YouTube, Instagram, and dedicated forums — but it is also a community where still images dominate. Most macro photographers share their best shots without any context for how difficult or time-consuming they were to produce. A POV video that shows the process addresses this directly:
- Context for the difficulty — 20 minutes prone in a meadow, an inch from a dragonfly, before a single keeper frame: the process video communicates this in a way that a standalone image cannot
- Educational value — other macro photographers genuinely want to see how you position yourself, how you approach nervous subjects, which camera positions produce the best image quality at 1:1 magnification
- Species identification and storytelling — a narrated POV video can identify species, explain the biological detail shown in the image, and create genuine natural history content rather than just photography showcase content
- Your own learning — watching a POV replay of your own macro session reveals positioning choices you made instinctively; reviewing this can identify why certain shots worked and others did not
Get the free POV Photography Cheat Sheet
Camera settings, EXIF tips, and export presets for Insta360 GO 3S, GoPro, DJI Action, and Ray-Ban Meta — all on one printable page. Includes macro-specific mounting tips.
Free PDF, no spam. Unsubscribe anytime.
Pick Your Rig for Macro Photography
Macro photography presents a specific mounting challenge: you are often very close to the ground, your working distance is measured in centimetres, and you cannot afford any camera vibration that might disturb your subject. Each POV capture option has different implications for this environment.
Clip Mount: Insta360 GO 3S
The Insta360 GO 3S is the macro photographer's best option for POV capture. At just 35 grams, it clips to your clothing — collar, jacket zip, brim of a hat — without adding any meaningful weight or bulk. At macro working distances, you can position the GO 3S very close to your lens axis, giving a perspective that genuinely shows the viewer where you are looking without requiring any additional support structure.
The FlowState stabilisation handles the subtle body movements inevitable when you are crouched or prone in field conditions. For static indoor macro work on a copy stand or focus rail, clip the GO 3S to the desk lamp or stand to give a static overhead perspective that shows your hands working through the setup.
Recommended settings for the GO 3S in macro work:
- Resolution: 2.7K at 30fps for field sessions; 1080p 60fps for lower-light indoor studio work
- Field of view: Wide for field sessions to show environmental context; Standard for studio work where you want a more compressed perspective
- Stabilisation: FlowState on at all times — essential when your body is doing the equivalent of a long-exposure shimmy to frame a subject
Head Mount
A head-mounted GoPro Hero 13 or DJI Action 5 Pro gives a true eye-level perspective — useful when you want to show exactly what you were looking at as you made each shooting decision. For macro field work, a head mount is the most natural option: the viewer sees the meadow from your height, then sees you crouch, and the POV camera follows your head movement down to the subject level.
Hot-Shoe Mount for Studio Macro
For controlled studio macro work — a specimen on a focus rail, macro stacking sequences of static subjects — a small action camera on the hot shoe of your stills camera gives the most precise "this is what the lens is aimed at" perspective. Combined with a desk-lamp or bench-mounted camera, this setup creates a documentary perspective that shows the technical precision of macro stacking work.
360-Camera for Flexible Reframing
An Insta360 X4 on a ground-level mount gives you maximum post-production flexibility. You can reframe the footage after the fact — showing the wide environmental shot, then the tight over-the-shoulder shot of you working, then the subject from an angle you could not have planned in advance. For the most technically sophisticated macro BTS content, this is the highest-ceiling option.
The Gear: What Macro Photographers Use
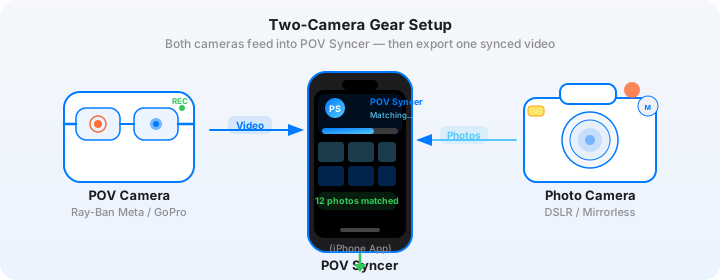
POV Camera: Insta360 GO 3S
For macro field work specifically, the Insta360 GO 3S wins on form factor. Its 35-gram weight and clip mount mean you can attach it directly to your clothing without any mount that interferes with your ability to get close to your subject. The stabilisation is class-leading for a camera of this size, and the 2.7K resolution is more than enough for social media delivery.
The GO 3S also has a magnetic attachment system that works with a wearable case — for macro photographers who work prone, you can attach the GO 3S to the rim of a sun hat for a perspective that genuinely shows the ground-level environment as you approach your subject.
Stills Camera: Sony A7C II
The Sony A7C II has become a favourite for macro field work. Its compact full-frame form factor and IBIS (in-body image stabilisation rated at 7 stops) mean you can work handheld at 1:1 magnification ratios in good light, which is transformative for field macro photography where a tripod often cannot be positioned effectively. The 33-megapixel full-frame sensor produces clean files at ISO 1600, and the fully articulating screen is essential when you are shooting at ground level.
Recommended settings for macro field sessions:
- Lens: Sony FE 90mm f/2.8 Macro G OSS or Tamron 90mm f/2.8 Di III VXD — both offer true 1:1 magnification, weather resistance, and AF useful for mobile insects
- Shutter speed: 1/500s minimum for moving insects in the field; 1/250s for static subjects; longer for tripod-mounted studio work
- Aperture: f/5.6 to f/11 for depth of field at 1:1 — at true macro magnification, even f/11 gives a depth of field measured in fractions of a millimetre
- ISO: 400-1600 for field work in natural light; go higher if you are using flash, which will freeze any motion and override the ISO noise
- Focus mode: Manual focus with focus peaking for precise control at 1:1; Sony's AF can be useful for larger insects that stay still, but manual focus gives more confidence at extreme magnification
- Drive mode: Silent shutter at 10fps for insects in motion; single shot for focus-stacked sequences on static subjects
The Hard Part: Manual Macro Video Editing
Before POV Syncer, creating a macro photography BTS video involved a specific editing challenge: macro sessions often produce a large number of frames (focus stacking sequences can run to 50-100 frames per subject, with multiple subjects per session), and the POV footage captures long periods of patient positioning with short windows of actual shooting. Manually identifying the shooting moments in GoPro or Insta360 footage, then placing the selected final images at those precise points on a Premiere timeline, took anywhere from two to four hours per session.
Many macro photographers simply gave up on BTS content because the editing overhead was disproportionate. The subject matter is remarkable. The process is fascinating. But three hours of additional editing work for a two-minute BTS video is not a sustainable overhead for a solo photographer.
The Fix: Automatic EXIF Sync in Under 60 Seconds
POV Syncer reads the EXIF timestamp embedded in every Sony RAW or JPEG file and matches it to the corresponding moment in your Insta360 GO 3S footage. The matching is precise to the second, using the same four-strategy cascade (GPS UTC, OffsetTimeOriginal, GPS-corrected timezone, device timezone fallback) that handles clock discrepancies between different camera systems.
For focus-stacked macro sequences, import your final processed and stacked images — not the individual bracket frames. The timestamp of the first frame in your stacking sequence will be used, placing the stacked result at the moment you began shooting that subject. The result is a populated timeline showing exactly when you approached and photographed each subject, in sequence, without any manual scrubbing or placement work.
Try the automatic EXIF sync — free on TestFlightStep-by-Step: Building Your Macro Photography BTS Video
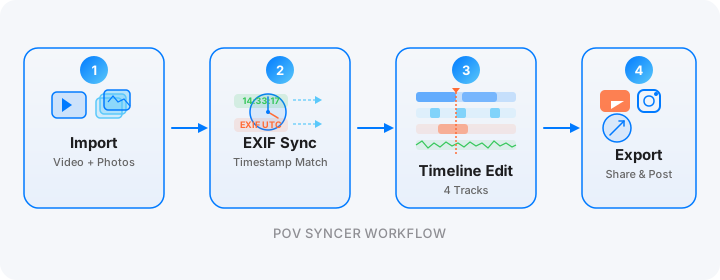
Step 1: Import. Transfer your Insta360 GO 3S footage via the Insta360 app or USB-C. Transfer your Sony A7C II files via the Sony Imaging Edge app or a card reader. Create a new project in POV Syncer and import both — the app handles up to 2,000 items per project, covering even a full-day field session.
Step 2: Review the match preview. POV Syncer shows you a visual match preview before processing — confirming which close-up shots matched to which moments in your footage. For macro sessions where you spent a long time on each subject, you will see the shots clustered at the periods of active shooting within longer passages of footage where you were repositioning or searching for new subjects. Check the match preview tutorial for guidance on interpreting any ambiguous matches.

Step 3: Process. Tap Process. All matching and rendering happens on-device — your macro images never leave your iPhone, iPad, or Mac.

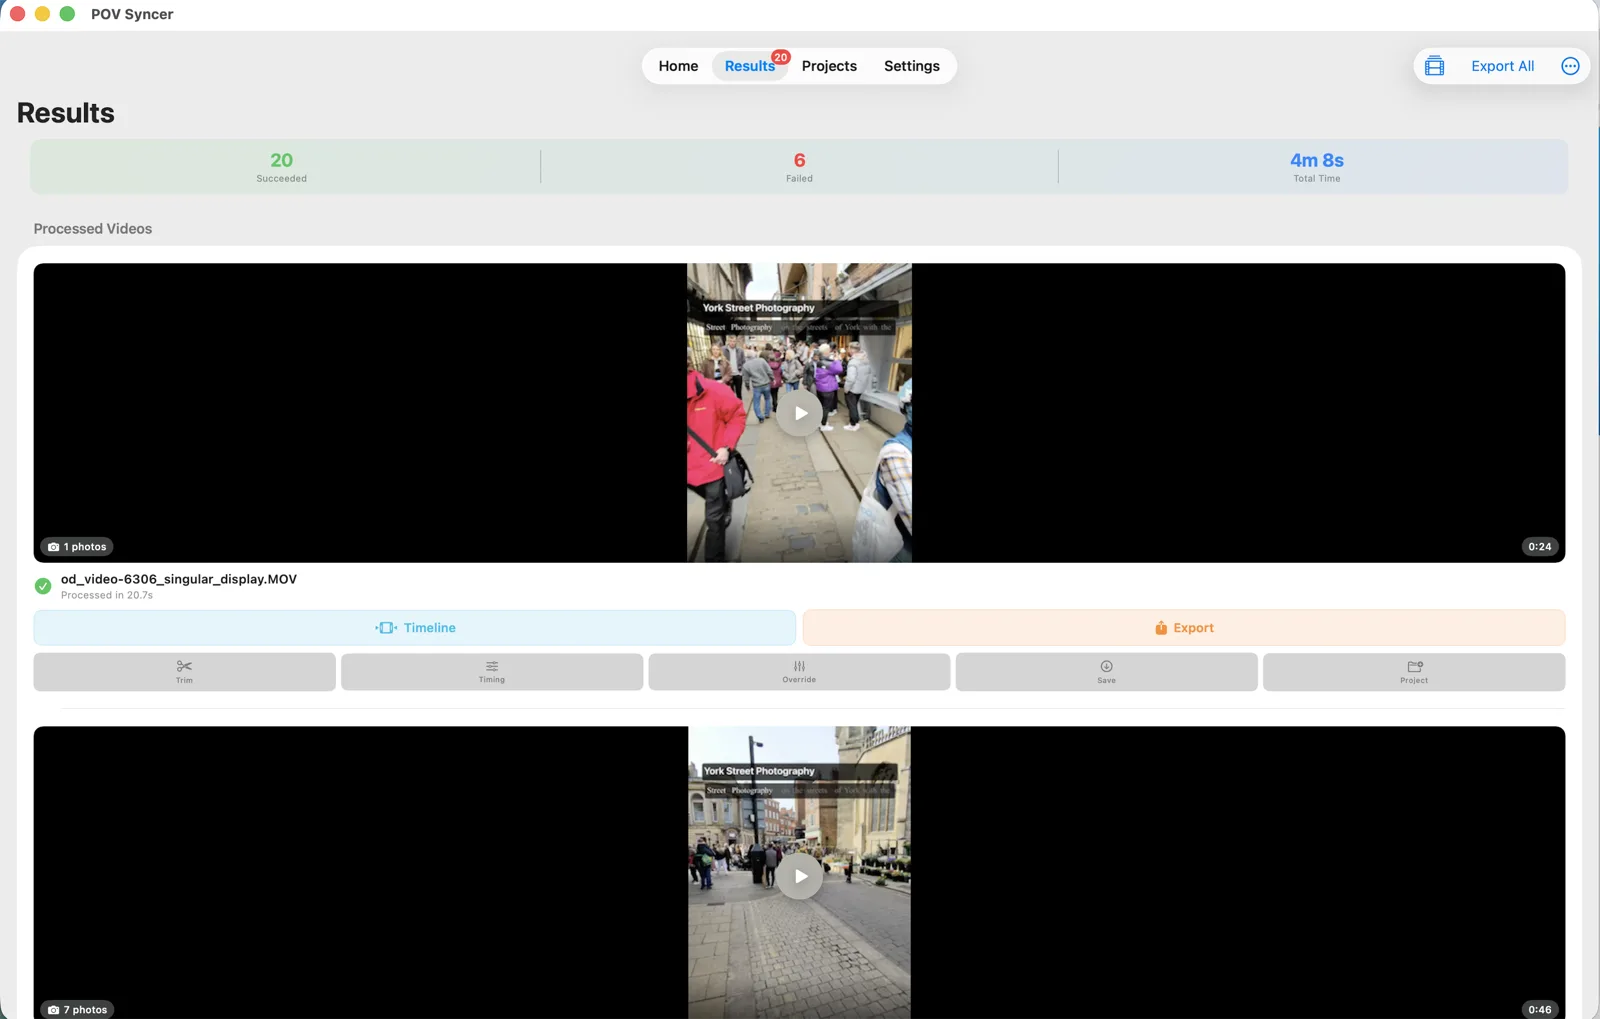
Step 4: See the results and open the timeline. The results view shows your populated timeline — each close-up image at its precise moment in the field footage. Open the multi-track timeline editor to polish the presentation.


Step 5: Add species titles and narration. For macro photography content, the titles track is where you add the most value — species name, common name, and any behaviour shown in the image ("Common Blue Damselfly — feeding on aphid — Surrey meadow, May 2026"). Choose from 15 premium fonts in the timeline editor. For AI narration, the six Azure neural voices include natural-sounding options well-suited to natural history narration — think BBC nature documentary in tone.
Step 6: Export. Export 16:9 for YouTube at 1080p or 4K, and 9:16 for Instagram Reels and TikTok. The same project produces both formats. Use Export All to Photos for batch processing if your field session produced multiple distinct location clips.
Works on iPhone, iPad, and Apple Silicon Mac
POV Syncer runs natively across all three platforms. For macro photographers who work with large RAW files from a Sony A7C II or similar full-frame camera, the Mac version handles the import and processing without the storage constraints that can affect iPhone workflows with very large file batches.
Under the Hood: How POV Syncer Gets the Timing Right for Macro Sessions
Macro sessions present a specific timing pattern: long periods of positioning with no shutter presses, then clusters of frames (focus stacks, burst sequences) compressed into short windows. POV Syncer's matching system handles this precisely:
- Four-strategy EXIF cascade — GPS UTC → OffsetTimeOriginal → GPS-corrected timezone → device timezone fallback. The Sony A7C II embeds OffsetTimeOriginal in its RAW files, which gives POV Syncer the UTC-corrected timestamp it needs for accurate matching even when the camera's local time setting is slightly off
- Adjustable match tolerance — for macro work where you fire a single deliberate shot rather than a burst, a tight tolerance (2-3 seconds) gives clean one-to-one matches. Widen it if your clocks drifted during a longer field session
- Per-video timing offset — if you shoot across multiple clips in a long field session and notice a systematic drift, apply an offset to the relevant clip without reimporting anything
- 100-photo cap per clip — import your processed selects (not the full focus-stack bracket sequences) for the cleanest timeline presentation
- Fully on-device processing — complete privacy; only AI voice narration uses the internet
Macro Photography-Specific Tips for Better POV Videos
Set Your Clocks Before Entering the Field
Sync both your Insta360 and Sony clocks from your phone before you leave the car or the house. In the field, reclocking either camera is impractical. If you notice a discrepancy when you review the match preview, use the per-video timing offset in POV Syncer to correct it without reshooting.
Shoot a Sync Reference Frame
At the start of each clip, photograph something at the GO 3S — hold your phone up to the clip, showing the current time, and take a single shot. This gives you a reference point to verify the sync accuracy before you commit the full session to processing.
Slow Down Your Approach for Better Footage
The best macro BTS footage shows a slow, deliberate approach to the subject — communicating the patience and care that macro field photography requires. If your POV footage shows you rushing to the next shot, it undercuts the quality of the revealed close-up images. Slow down on purpose. The approach footage is as important as the shooting footage.
Use 3-4 Second Photo Hold for Close-Up Detail
Macro images reward extended viewing time — the viewer needs a moment to understand what they are looking at and to take in the detail. Set photo hold duration to 3-4 seconds in the timeline editor, longer than you would use for genre photography where the image is immediately legible at a glance.
Add Shutter Sound at Each Reveal
The camera shutter sound effect in POV Syncer works particularly well for macro reveal content — it creates a distinct audio cue that marks each image appearance, and it grounds the close-up reveal in the physical act of photography that produced it.
Narrate the Technical Process for YouTube
Macro photography YouTube audiences are specifically interested in the technical process — aperture choice, depth of field management, focus stacking workflow, flash setups. Use POV Syncer's AI narration (or record your own voiceover) to narrate the technical decisions as they appear in the video. "I switched to f/11 here to get the entire head in focus — at 1:1 that gives me about 0.8mm of depth of field" is the kind of comment that earns subscribers in the macro photography community.
Start showing the invisible world you shoot
Import your GO 3S footage and Sony macro shots. EXIF sync builds the timeline automatically — free during the beta.
Download on App Store — FreeFrequently Asked Questions
What POV camera works for macro photography where you are very close to the subject?
The Insta360 GO 3S is ideal — its tiny form factor means you can clip it to your clothing very close to your work area without blocking your access to the subject. It gives a genuine close-working perspective at 1:1 shooting distances without the bulk of a chest-mount action camera interfering with your positioning.
Does POV Syncer work with focus-stacked macro images?
Yes — POV Syncer uses the EXIF timestamp of each individual image. For focus-stacked sequences, import your final stacked and processed images rather than the raw bracket frames. The timestamp will correspond to the moment you set up that shot, placing the stacked result at the correct point in your POV footage.
My macro sessions last several hours — can POV Syncer handle that?
POV Syncer imports up to 2,000 photos and videos per project. For long sessions across multiple clips, the per-video timing offset control lets you fine-tune the sync for each individual clip if the cameras drifted slightly over time. Save and reload projects to continue working across sessions.
Conclusion: Make Your Invisible Process Visible
Macro photography reveals a world that most people walk past without seeing. A POV behind-the-scenes video takes that revelation one step further, showing not just the hidden world in the image but the hidden work that produced it. The patience, the physical contortion, the millimetre-precision positioning — all of it visible in the footage, punctuated by the close-up images that emerged from that effort.
What used to require three hours of manual timeline editing now takes under 60 seconds with POV Syncer. Import your Insta360 GO 3S footage and your Sony macro shots, review the match preview, process, polish with species titles and narration, and export. Every field session becomes educational content. Every close-up gets the context that makes it extraordinary.
For the broader workflow context, read the street photography POV video process guide and the EXIF timestamps explained guide for a deeper understanding of how the matching system works.
Ready to show the invisible world you photograph?
Download POV Syncer free on TestFlight. Import your first macro session and see the automatic sync in action.
Join 1,000+ photographers getting weekly tips. Unsubscribe anytime.