That story — the wait, the kit, the moment — is what your wildlife photography audience actually wants to see. The finished image is extraordinary, but it doesn't convey the patience, the knowledge of the species, the technical preparation, or the very specific suffering involved in lying in a reed bed in November. A POV video does. And with POV Syncer, your GoPro chest-mount footage and your Canon R7 stills are automatically synced using EXIF timestamps — so the photograph appears in the footage at the exact second you pressed the shutter, without a single frame of manual scrubbing.
What Are Wildlife Photography POV Videos?
A wildlife photography POV video is the behind-the-scenes format applied to the specific challenges and rewards of wildlife work: the approach to a hide or a position, the waiting, the interaction with the subject, and the moment of capture — with the resulting still photograph placed automatically at the exact moment of the shot using EXIF timestamps.
For bird photography in particular, the format has exceptional narrative power. The contrast between the wide-angle chest-mount footage of a photographer in a hide and the 600mm telephoto close-up of a kingfisher two metres away is genuinely dramatic. Viewers who are not photographers understand immediately what the long lens achieves. Viewers who are photographers immediately want to know the focal length, aperture, ISO, and shutter speed — all of which you can deliver in a single narration sentence or text overlay.
Why POV Videos Transform Wildlife Photography Accounts
Wildlife photography is one of the least visually accessible genres to non-photographers. The images are extraordinary, but without context — the distance to the subject, the hours of waiting, the gear required — they can look almost like stock photographs rather than field photography. The POV behind-the-scenes format provides that context entirely.
There are three specific ways it helps wildlife photographers:
- Educate about the craft. A 60-second Reel showing a photographer setting up a hide, waiting, then capturing a behaviour shot with 600mm glass teaches more about wildlife photography than any gear review. The audience sees why the lens matters, why the position matters, why the patience matters.
- Build conservation connections. Footage of a habitat — the wetland, the woodland, the coastal clifftop — contextualises the species you're photographing in a way that the photograph alone doesn't. POV wildlife videos become implicit conservation advocacy.
- Relive the session. Watching back three hours of footage from a morning at a hide, with your photographs placed automatically at their captured moments, reveals patterns you never see in the field: which perches the subject prefers, how it behaves before and after a shot opportunity, how the light changes across the morning.
Pick Your POV Camera for Wildlife Work
GoPro Hero 13 on a Chest Harness (Primary Recommendation)
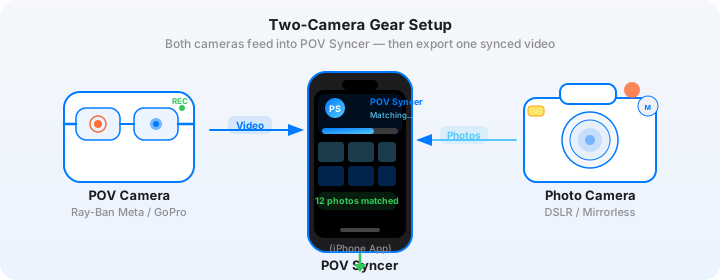
For wildlife photography, a chest-mounted GoPro is the most practical POV camera. It captures the moment you raise the telephoto to your eye, the direction you're pointing the lens, and the environment around you — giving viewers the full picture of what a wildlife shoot actually looks like. The GoPro Hero 13's 4K/60fps with HyperSmooth stabilisation handles the shaky movements of approaching a subject across uneven terrain. GPS recording in the Hero 13 activates POV Syncer's most accurate matching strategy.
Settings: 4K/30fps (60fps if the subject is active), Wide FOV (not SuperView — too distorted for people footage), HyperSmooth Standard, GPS On, Protune off for natural colour.
DJI Action 5 Pro (Best for Dynamic Wildlife)
The DJI Action 5 Pro's excellent dynamic range handles the challenging mixed lighting of woodland and wetland environments better than the GoPro. Its flat colour profile gives you more latitude in post if you want a cinematic grade for YouTube content. The magnetic mounting system makes it easier to move between positions during a multi-location session.
Ray-Ban Meta (For Incidental Wildlife)
Ray-Ban Meta is less suited to dedicated hide-based wildlife photography but works well for incidental wildlife shots — birds encountered during a walk, mammals at the edge of a woodland path, raptors circling overhead. The eye-level footage and natural approach (you're just walking normally, wearing glasses) avoids startling subjects the way a visible chest mount occasionally does.
Insta360 GO 3S (For Remote or Tight Spaces)
The tiny Insta360 GO 3S can be mounted on a hat, jacket collar, or even the side of a hide, giving you an angle that a chest harness can't achieve. Useful for recording from inside a hide without the bulk of a chest-mounted camera making movement awkward.
The Gear: Action Cam + Telephoto Stills Rig
GoPro Hero 13 + Canon R7 with RF 100-500mm
The Canon R7 is one of the best wildlife cameras available in 2026 — its APS-C sensor with 32.5MP resolution and 30fps electronic shutter makes it exceptional for bird photography. The RF 100-500mm f/4.5-7.1 gives you a 160-800mm equivalent range on APS-C, covering everything from wading birds at a wetland edge to raptors at distance. The R7's EXIF data is comprehensive and includes UTC offset — essential for accurate POV Syncer matching.
Settings for the R7 + RF 100-500mm: RAW + JPEG (JPEG for quick POV Syncer import; RAW for final editing), AI Subject tracking AF, minimum shutter 1/2000s for birds in flight, 1/500s for perched birds, Auto ISO up to 25600. Servo AF with Animal AI detection. EXIF UTC offset set to local timezone.
GoPro Hero 13 + Sony A7C II with 200-600mm G OSS
The Sony A7C II at 33MP full-frame paired with the Sony FE 200-600mm f/5.6-6.3 G OSS is a formidable wildlife combination — the full-frame advantage shows in shadow recovery and per-pixel detail at extreme reach. The 200-600mm's optical stabilisation combined with the A7C II's in-body IS makes handheld wildlife shooting genuinely viable. Sony's EXIF data includes GPS when the camera is used with the Imaging Edge Mobile app for location sync.
DJI Action 5 Pro + Nikon Zf with Z 100-400mm
The Nikon Zf pairs a 24.5MP full-frame sensor with a beautiful retro body and exceptional high-ISO performance. The Z 100-400mm f/4.5-5.6 VR S covers typical bird photography distances beautifully. The Zf's analogue controls make exposure adjustment in the field fast and tactile. Its EXIF data includes full UTC offset information for reliable POV Syncer matching.
The Editing Grind — and How POV Syncer Replaces It
Wildlife photography behind-the-scenes editing has a unique challenge: the sessions are long, the moments of action are brief and widely spaced, and finding each shot in several hours of footage is an exercise in very patient scrubbing. A three-hour hide session might produce 150 wildlife stills, each one requiring you to find its precise second in three hours of 4K GoPro footage. That's approximately 4 to 5 hours of editing for material you could turn into a 60-second Reel — if you could bear to do it.
Most wildlife photographers don't. The footage sits on a hard drive. The story of that session is never told.
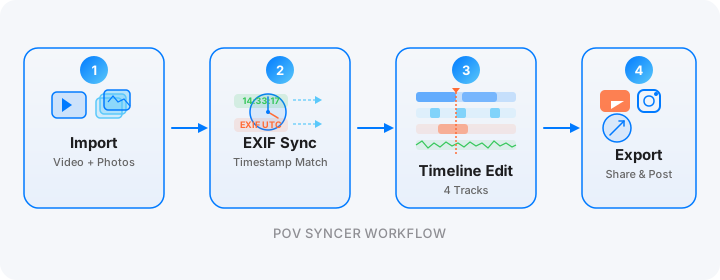
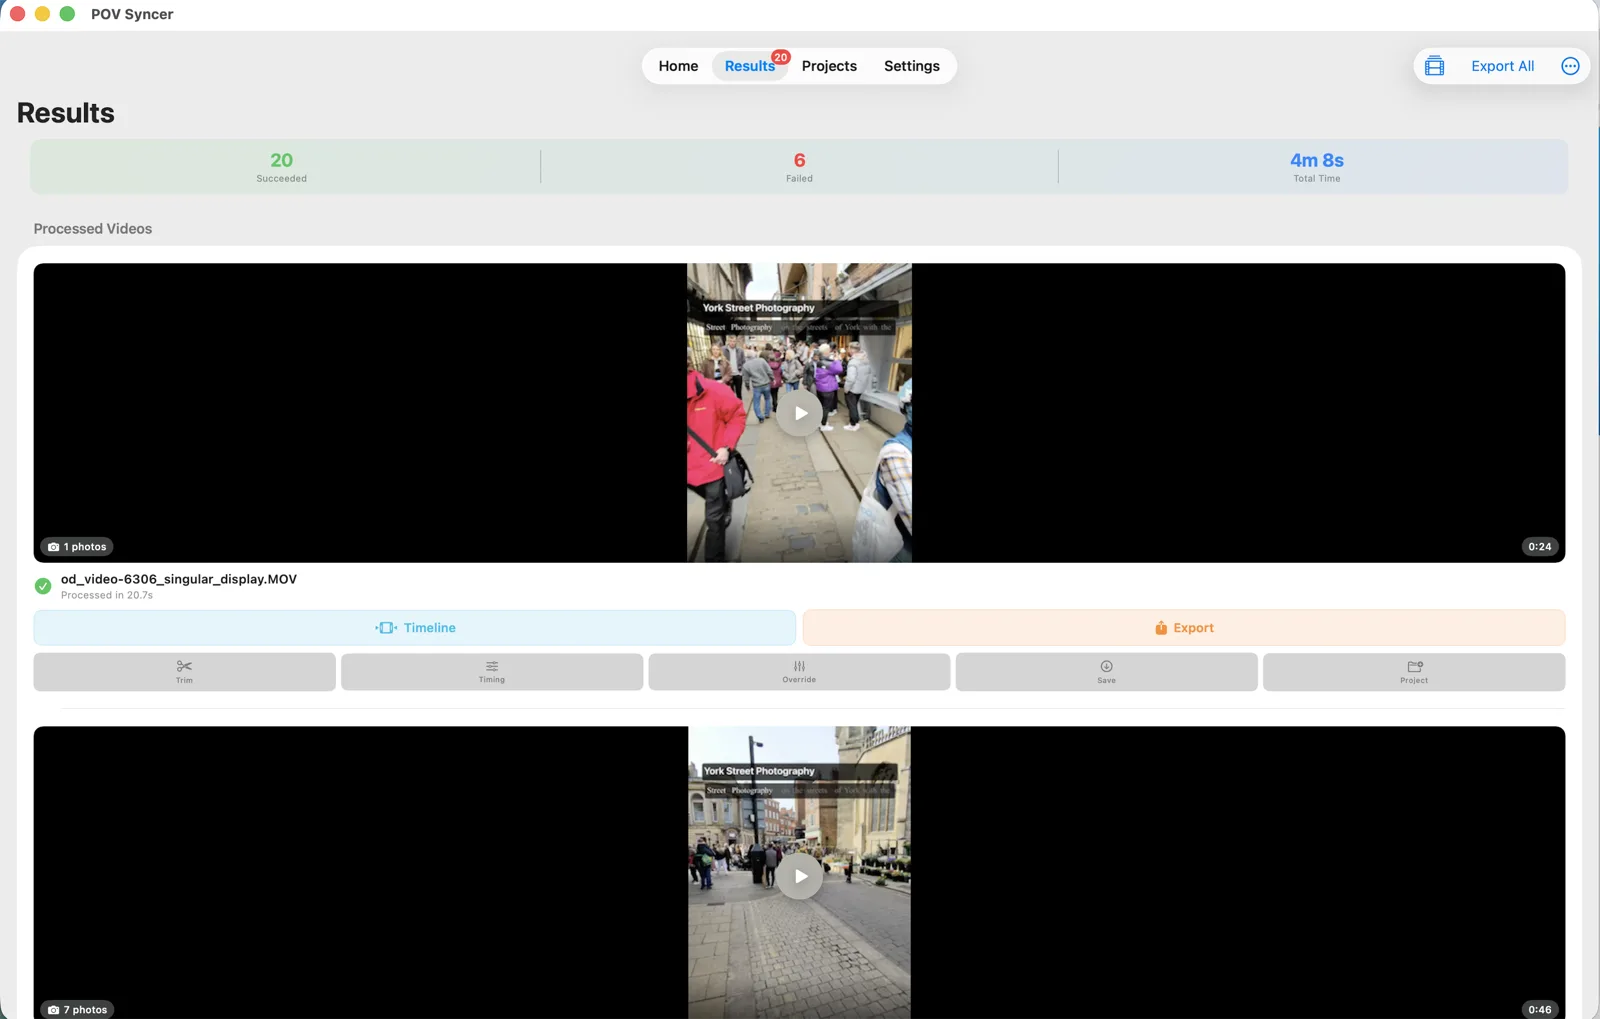
POV Syncer changes this completely with automatic EXIF sync. Here is the full workflow:
Step 1: Import
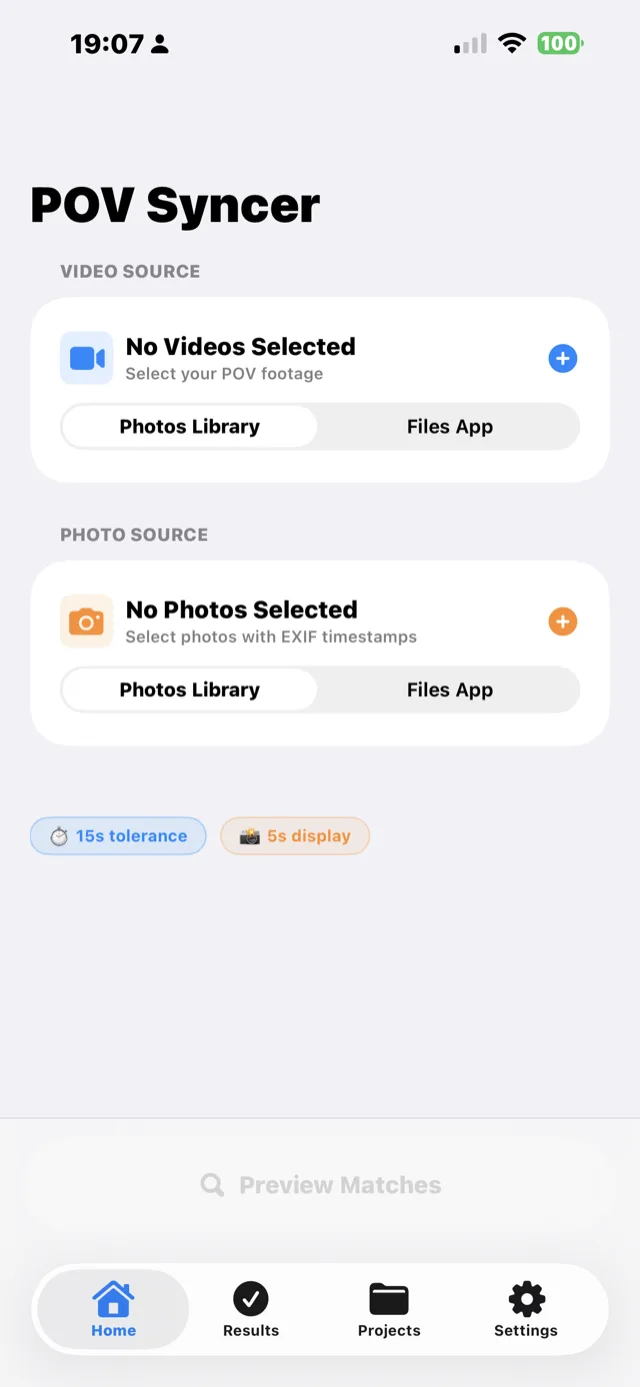
Create a new project. Import your GoPro Hero 13 clips from the GoPro Quik app or via the Files app. Import your Canon R7 or Sony A7C II JPEGs. POV Syncer handles up to 2,000 files per project — enough for even a week-long wildlife trip.
Step 2: Match Preview

Review the Match Preview. For wildlife photography, the adjustable match tolerance is particularly useful — set it to ±5 seconds to handle situations where your R7 clock has drifted slightly from the GoPro. Use the per-video timing offset to correct any systematic drift identified during review.
Steps 3–5: Process, Timeline, Export


On the timeline, add a species identification in the title track ("Alcedo atthis — River Kingfisher, Somerset Levels, 07:43"). Add a brief AI narration for context. Choose from Sonia or Ryan (British English), Jenny or Guy (American English), or Natasha or William (Australian English) — whichever matches your audience. Export at 9:16 for Reels and Shorts, 16:9 for YouTube nature content.
Tell the story behind the shot
POV Syncer is free during beta. Import your GoPro footage and your telephoto stills. EXIF matching places every photograph at the exact moment of capture — automatically.
Download POV Syncer FreeWorks on iPhone, iPad, and Mac
POV Syncer runs natively on iPhone, iPad, and Apple Silicon Mac. For wildlife photographers who do evening processing in the field on a MacBook, the Mac version gives you the full-width timeline editor with keyboard shortcuts and Finder drag-and-drop for files. On iPad with an Apple Pencil, the timeline precision is excellent for placing narration segments at exactly the right moments in long sessions.
Under the Hood: EXIF Matching for Long-Session Wildlife Photography
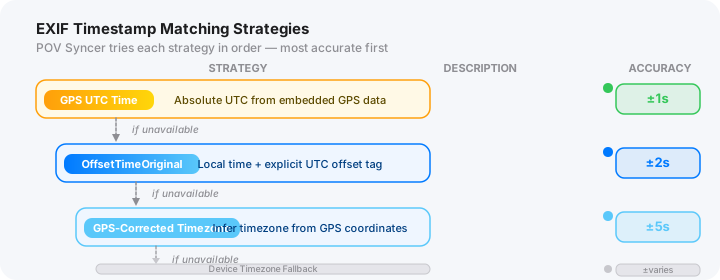
Wildlife photography EXIF matching has one specific challenge that most other genres don't: clock drift over long sessions. A GoPro Hero 13 with GPS enabled syncs its clock to GPS time at the start of the session, but the drift between GoPro GPS time and your Canon R7's manually set clock can be 1 to 5 seconds over a 3-hour session.
POV Syncer handles this with:
- GPS UTC matching — uses absolute GPS UTC for both cameras when available, eliminating drift entirely.
- Adjustable tolerance — set to ±3 seconds for single-shot wildlife photography where timing is critical; ±10 seconds for longer burst sequences.
- Per-video timing offset — if the GoPro clock is consistently 4 seconds ahead of the Canon, apply a −4 second offset to all clips from that session.
- 100-photo-per-clip cap — for sessions with 200+ stills in a single clip, photos are spread evenly to prevent any individual clip from being overwhelmed with overlays.
Six Tips for Wildlife Photography POV Videos
1. Enable GPS on Your GoPro Before Every Session
This is the single most impactful setting for EXIF accuracy. With GPS enabled on the GoPro Hero 13, the GPS UTC matching strategy gives you millisecond-level accuracy — eliminating the need for any manual timing correction in POV Syncer. Menu → Preferences → GPS → On.
2. Sync Your Stills Camera Clock to GPS Time
Before a session, connect your Canon R7 or Sony A7C II to its companion app (Canon Camera Connect or Sony Imaging Edge Mobile) and sync the clock from your GPS-connected iPhone. This aligns the stills camera clock to GPS UTC time, matching the GoPro's reference perfectly.
3. Record Arrival and Setup, Not Just the Action
The most engaging wildlife POV videos include the approach and setup sequence — walking to the hide, setting up the tripod, getting into position. This footage gives viewers the environmental context that makes the eventual photograph more meaningful. Don't start recording only when you think action is imminent.
4. Narrate the Species and Behaviour
A 20-second AI narration identifying the species, explaining its behaviour, and describing the light conditions adds enormous educational value. "This is a male pied flycatcher, Ficedula hypoleuca, returning to a nest box at 600m altitude in Mid Wales. June light, 7am. 1/2000s at f/5.6, ISO 3200, 500mm." That sentence doubles the instructive value of the footage.
5. Use the 100-Photo Cap to Select Your Best Shots
In burst photography for birds in flight, you might take 200 frames per sequence. POV Syncer's 100-photo-per-clip cap means the best practice is to pre-select your best 50 to 80 frames per session before importing, rather than importing the full burst. This produces a much more watchable POV video than one where photographs appear every half-second throughout.
6. Export as Chapters for Long YouTube Content
For YouTube nature content, a 10-minute wildlife POV video with chapter markers (added via POV Syncer's title track) performs better than a single unbroken video. Use the title track to add chapter headings: "0:00 — Arrival at the hide", "2:30 — First sighting", "6:15 — The shot". YouTube's chapter system makes this immediately navigable.