That footage, combined with your stills, is the raw material for the most authentic travel photography content format available. But until now, cutting it together meant hours of manual scrubbing in Premiere or Final Cut: find each shot in the footage, note the timecode, drag the photo over, nudge it. An hour of session footage with 60 stills could take four hours to edit. Most travel photographers simply don't bother.
POV Syncer changes that completely. It reads the EXIF timestamp from each photograph and places it at the exact corresponding moment in the Ray-Ban Meta footage — automatically. What used to take hours now takes under 60 seconds. You get back to exploring.
What Are Travel Photography POV Videos?
A travel photography POV video combines two things that travel photographers already produce separately: the immersive first-person footage from your POV camera, and the deliberate, carefully composed still photographs from your mirrorless or compact camera. POV Syncer connects them by their EXIF timestamps — so when the video plays, your photographs appear at exactly the seconds they were taken, right in the middle of the footage of the environment where you captured them.
The format tells a complete story: this is where I was, this is what I was looking at, and this is the image that came out of that moment. It's the difference between posting a beautiful photograph and posting an experience. Travel photography audiences — especially on Instagram Reels and YouTube — respond enormously to the experiential format.
Why Travel Photographers Love This Format
Travel photography is inherently about place and atmosphere — qualities that a single still image can suggest but never fully convey. The POV video does what the photograph can't: it shows the light in motion, the sounds of the market, the distance you walked, the moment before the decisive frame. Then the photograph appears and the viewer understands exactly why you stopped, raised the camera, and captured that particular fraction of a second.
Beyond the audience-facing reasons, there are three personal ones:
- Relive the trip. A two-hour morning walk through a new city — reconstructed with your stills automatically placed in the footage — is a remarkably rich record of how you actually experienced the place. Better than any journal entry.
- Learn from your process. Watching Ray-Ban Meta footage of yourself shooting reveals things you never notice in the moment: how quickly you raise the camera, how often you hesitate, which compositions you walk past without stopping for.
- Teach your audience. A behind-the-scenes travel photography video with a brief narration about the light, the timing, the focal length is more instructive than any written post. Your followers learn how you see.
Why Ray-Ban Meta Is Perfect for Travel Photography
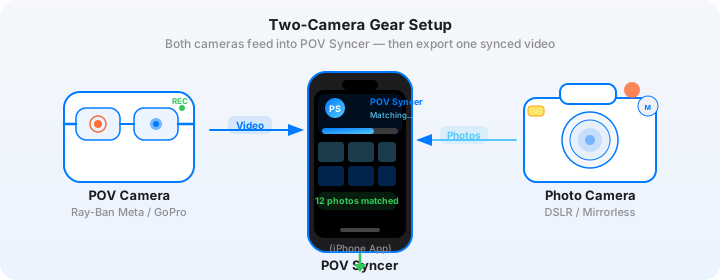
Ray-Ban Meta Gen 2, released in September 2025, records 3K video at 30fps with a 12-megapixel ultra-wide lens and a five-microphone audio system. The audio capture alone is a significant advantage for travel content — the ambient sound of a Moroccan souk or a Tokyo fish market, recorded while you're walking through it at eye level, is irreplaceable context for the photographs that come out of that environment.
The critical advantage over a chest-mounted GoPro or DJI Action cam for travel photography is inconspicuousness. In sensitive locations — religious sites, markets, protest areas, anywhere that people are wary of cameras — Ray-Ban Meta glasses are simply glasses. Locals don't modify their behaviour. Children don't pose. The scene you're filming is the scene as it actually exists, not a version of itself aware of being documented.
Battery life with the Gen 2 is approximately 8 hours of mixed use, with 30 to 40 minutes of continuous video recording per charge. The charging case extends total availability significantly. For a full travel day, keep the case in your bag and drop the glasses in briefly during lunch or transit. You'll never miss the shot that defines the afternoon.
Time sync is automatic: the Meta AI app syncs the glasses' internal clock to your iPhone when connected. This means the Ray-Ban Meta footage timestamps are as accurate as your iPhone's GPS time — which is the most reliable reference possible for POV Syncer's matching engine.
Pick Your Capture Approach
Ray-Ban Meta isn't the only option for travel POV. Here are the four standard approaches, adapted for travel photography specifically:
Ray-Ban Meta Gen 2 (Best for Culture and Street)
The invisible option. Ideal for markets, street photography in dense urban environments, documentary travel, and anywhere that a visible camera would change the scene. The 3K footage is sufficient for all social platforms. Primary limitation: fixed field of view, no zoom, no stabilisation beyond the optical.
Chest-Mounted DJI Action 5 Pro (Best for Landscape and Active Travel)
The 4K/120fps DJI Action 5 Pro on a chest mount gives you stabilised wide-angle footage with excellent dynamic range — useful for landscape travel photography where you want the environment, not just the eye-level view. The trade-off is visibility: you look like a content creator, which works well for travel vlogging but can affect the candid quality of street and documentary work.
Hot-Shoe Mounted GoPro (Most Camera-Perspective POV)
A GoPro Hero 13 clipped to a cold shoe on top of your mirrorless camera gives footage from almost exactly the camera's own perspective. When your X100VI stills appear in the POV Syncer timeline, viewers understand immediately that they're seeing what the camera was seeing. Useful for technical photography tutorial content.
Insta360 GO 3S (Ultra Compact, Any Angle)
The Insta360 GO 3S weighs 35 grams and clips anywhere — shirt collar, backpack strap, jacket pocket. For travel photographers who want total flexibility in mounting position without a dedicated chest rig, the GO 3S gives you genuinely first-person footage from any vantage point. Its automatic AI reframe makes vertical exports trivial.
The Gear: Ray-Ban Meta + Your Travel Stills Camera
Ray-Ban Meta Gen 2 + Fujifilm X100VI
The definitive travel photography POV kit in 2026. The Fujifilm X100VI at 23mm (35mm equivalent, f/2.0) is small enough to fit in a jacket pocket, produces outstanding JPEG output with film simulations like Classic Chrome and Velvia, and supports GPS location sync via the Fujifilm XApp — which writes GPS coordinates into EXIF, enabling POV Syncer's most accurate matching strategy. The combination of invisible Ray-Ban Meta footage and X100VI stills creates a narrative arc that feels genuinely cinematic: wide, immersive eye-level video, then the tight, intentional still frame.
Settings for travel with the X100VI: JPEG Fine + RAW, Classic Chrome film simulation, Auto ISO 200–6400, minimum shutter 1/250s (1/500s in bright conditions), f/2.8 for most street and market work. Enable location sync in the XApp before the session.
Ray-Ban Meta Gen 2 + Sony RX100 VII
The Sony RX100 VII is the most capable truly pocketable camera available — the 24-200mm equivalent f/2.8-4.5 Zeiss lens covers everything from wide environmental shots to compressed telephoto frames, all in a camera that fits in a jeans pocket. Its EXIF data is comprehensive and reliable. For travel photographers who want versatility over a prime lens aesthetic, the RX100 VII is an outstanding Ray-Ban Meta partner.
Ray-Ban Meta Gen 2 + Leica Q3
For travel photographers who prioritise image quality above all else, the Leica Q3 at 28mm f/1.7 produces photographs that are meaningfully different from APS-C cameras — richer rendering, more three-dimensional depth, a quality that's immediately visible even on phone screens. The Q3 has built-in GPS that records precise coordinates into EXIF. It's heavier and more expensive than the X100VI, but the combination with Ray-Ban Meta creates content that stands out visually.
The Hard Part — and How POV Syncer Fixes It
Here's the brutal truth about manual travel photography POV editing. You've just spent four days in Kyoto. You've taken 400 photographs across 12 hours of Ray-Ban Meta footage split across 24 clips. Finding each of 400 photographs in 12 hours of footage, one by one, takes approximately 30 to 40 seconds per photo minimum — and that's if you're fast. You're looking at 3 to 4 hours of editing just to place photos on the timeline, before you've touched narration, music, or export.
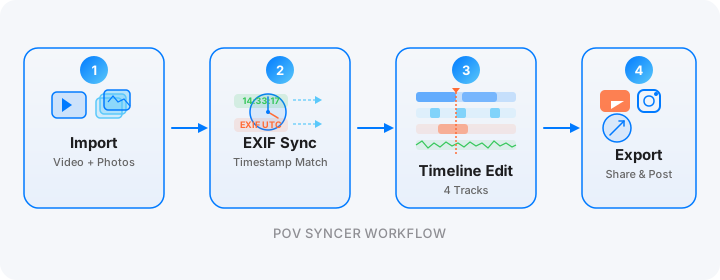
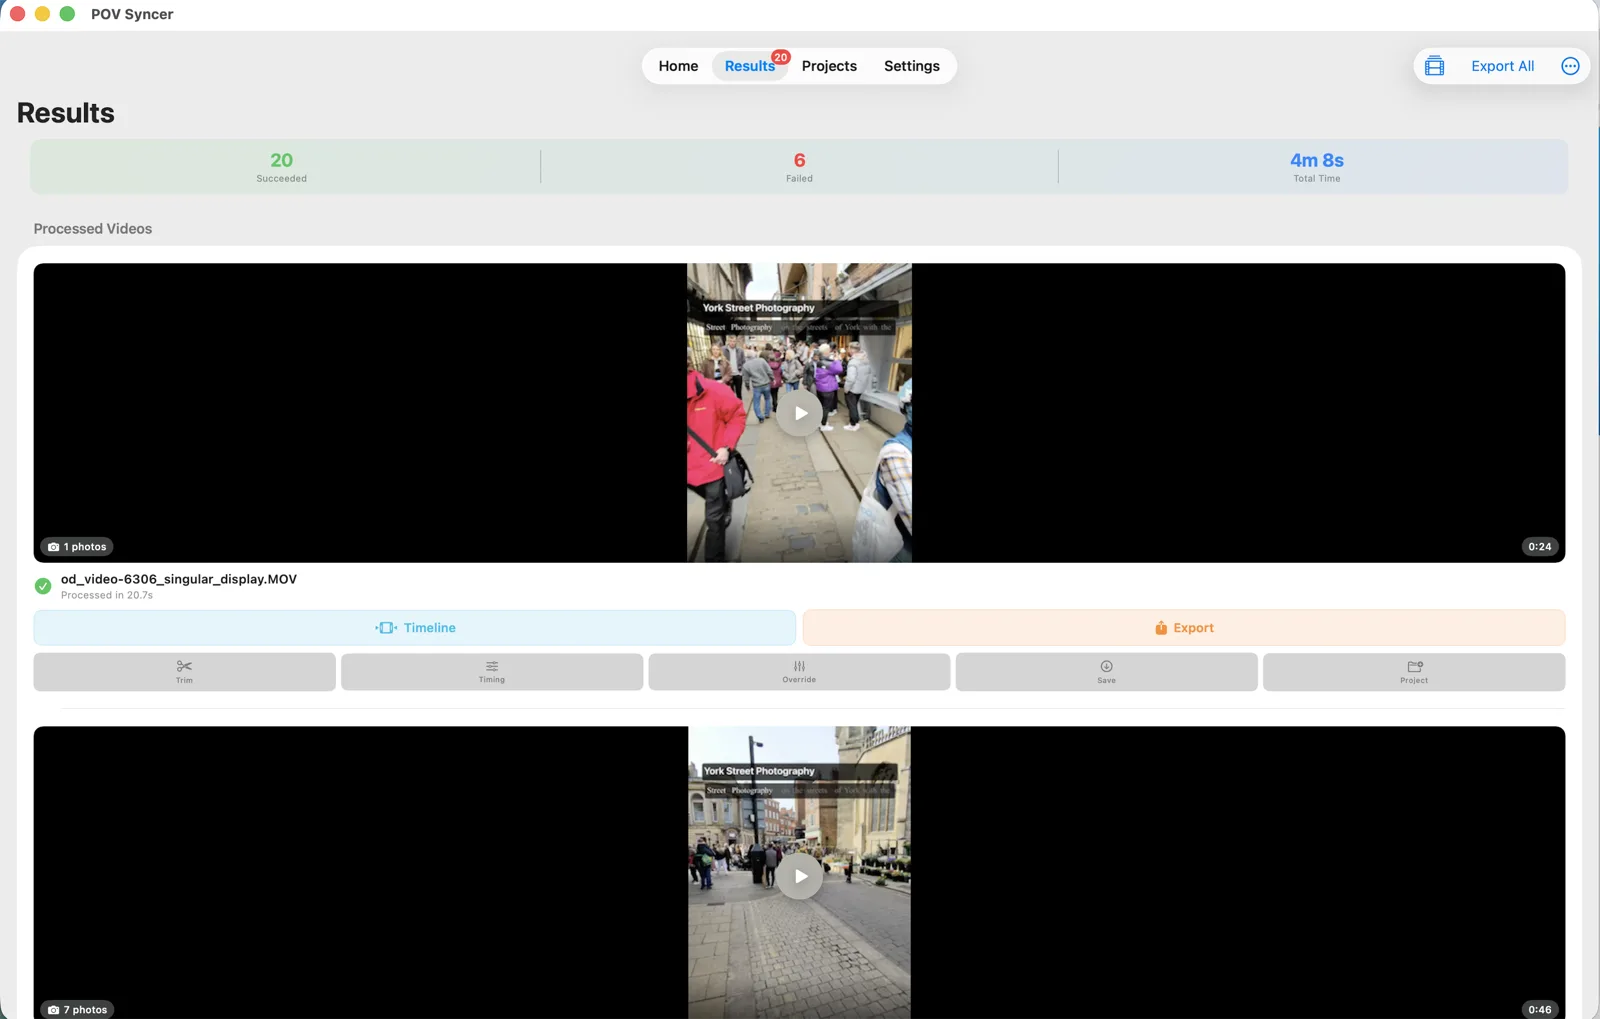
POV Syncer replaces all of that with automatic EXIF matching. The four-strategy cascade handles the complexity of matching photos taken across multiple time zones, different UTC offsets, and varying clock accuracy — all automatically.
Step 1: Export Ray-Ban Meta Clips
In the Meta AI app, select the clips from your session and export to your iPhone camera roll. For a full day of travel shooting, this produces a sequence of 3K clips covering all your walking time.
Step 2: Import into POV Syncer
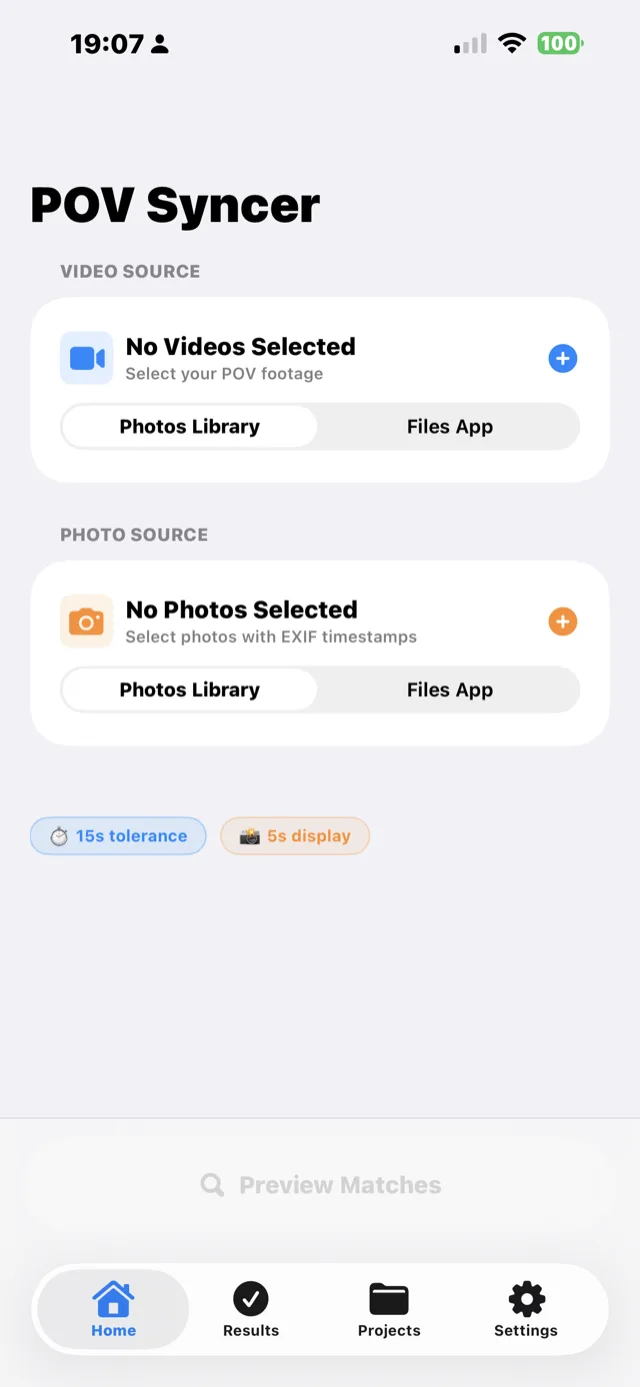
Open POV Syncer and create a new project. Add your Ray-Ban Meta clips and your travel stills. The app accepts up to 2,000 items per project — enough for even the most prolific travel photographer's full-day sessions.
Step 3: EXIF Match Preview

POV Syncer runs its four-strategy EXIF cascade. For Ray-Ban Meta + X100VI with location sync enabled, the GPS UTC strategy typically gives millisecond-level accuracy. Review the Match Preview — for a typical travel session of 60 stills, this takes about 5 minutes to review and approve. Use the per-video timing offset to correct any systematic clock drift.
Steps 4–6: Process, Polish, Export


On the timeline, add a brief AI narration for context — 15 seconds explaining the location and light conditions works perfectly over the approach footage. Choose from six Azure neural AI voices. Add location titles using any of the 15 premium fonts. Export at 9:16 for Reels and Shorts or 16:9 for YouTube travel vlogs.
Your travel photography — as a story, not just a gallery
POV Syncer is free during beta. Import your Ray-Ban Meta clips and your travel stills. Automatic EXIF matching places every photo at the exact moment it was taken.
Download POV Syncer FreeWorks on iPhone, iPad, and Mac
POV Syncer runs on iPhone, iPad, and Apple Silicon Mac. For travel photographers, the iPhone workflow is the most practical — everything happens in your pocket between locations. On iPad or Mac at the hotel in the evening, the larger timeline editor makes multi-clip session editing significantly more comfortable. The project saves automatically and can be resumed across devices.
Under the Hood: How EXIF Matching Works Across Time Zones
Travel photography presents a specific EXIF challenge that street photography doesn't: time zones. You fly to Tokyo, change the local time on your Fujifilm but forget to update the UTC offset. Or you're shooting in Portugal and your Sony RX100 VII is still set to London time. Or you're crossing a date line.
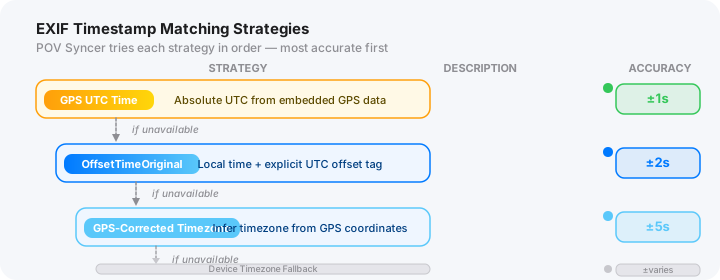
POV Syncer's four-strategy cascade is specifically designed to handle these scenarios:
- GPS UTC: Both Ray-Ban Meta (synced to iPhone GPS) and GPS-equipped cameras (X100VI with location sync, Q3) record absolute UTC times. These match regardless of which local timezone either device thinks it's in.
- OffsetTimeOriginal: If GPS isn't available, POV Syncer reads the UTC offset stored in the EXIF. Cameras set to local time with correct UTC offset matching the destination timezone will sync accurately.
- GPS-corrected timezone: If coordinates exist but no UTC offset, POV Syncer infers the timezone from the GPS location — handling the "forgot to update UTC offset but GPS was on" travel scenario.
- Device timezone fallback: Last resort, uses the device's local timezone. Add a per-video offset correction if needed.
Additional controls: adjustable match tolerance (±3 to ±10 seconds for travel photography where timing is often less critical than street photography); per-video timing offset for systematic correction; and the 100-photo cap per clip ensures that a 400-photo import spreads proportionally across a long day of footage.
Six Tips for Better Travel Photography POV Videos
1. Enable Location Sync Before Landing
Before you land in a new destination, open the Fujifilm XApp and ensure location sync is active. The first photograph you take will have GPS coordinates — which activates POV Syncer's GPS UTC matching strategy immediately, and means you never have to worry about timezone differences again.
2. Record the Environment, Not Just the Shot Moments
For travel content, the footage between shots is as important as the shots themselves. Walk slowly. Let the Ray-Ban Meta record the texture of the location — the sounds, the light, the crowds. The photographs are the punctuation; the footage is the prose. Don't fast-forward through it in editing.
3. Use One Long Clip Per Location
Rather than starting and stopping the Ray-Ban Meta recording constantly, record one long clip per neighbourhood or location. This gives POV Syncer a clean continuous timeline to place photos within, and preserves the ambient audio continuity that makes travel footage immersive.
4. Charge the Case During Transit
The Ray-Ban Meta charging case charges from any USB-C power bank. During taxi rides, metro journeys, or café stops, slip the glasses into the case and charge for 20 minutes. For a 10-hour travel day, this routine ensures you're never without recording capability at the crucial moments.
5. Narrate the Context, Not the Obvious
Your AI narration should tell viewers something they couldn't know from the footage alone — not "I'm in Lisbon" (they can see that), but "I'd been standing at this corner for 40 minutes because the light on the tiles only does this for about 20 minutes after sunrise." That kind of context makes travel photography educational rather than just decorative.
6. Batch Process Before the Flight Home
On the last evening of a trip, batch process all your project sessions using Export All to Photos. This gives you a complete archive of every day as a POV video, exported to your camera roll while you sleep. You land home with shareable content ready rather than weeks of editing ahead of you.
Frequently Asked Questions
How long does Ray-Ban Meta Gen 2 battery last for travel photography?
Approximately 8 hours of mixed use, with 30 to 40 minutes of continuous video recording per charge. The charging case significantly extends total availability. For full-day travel sessions, keep the case in your bag and charge during natural breaks.
Does Ray-Ban Meta sync reliably with mirrorless EXIF data?
Yes. Ray-Ban Meta syncs its clock to your iPhone automatically. With your stills camera UTC offset set correctly (or GPS enabled), POV Syncer achieves sub-second matching accuracy across all major travel camera brands.
Which travel cameras pair best with Ray-Ban Meta?
The Fujifilm X100VI (GPS via XApp, excellent JPEG, pocket-sized), Sony RX100 VII (zoom range, pocket-sized), and Leica Q3 (built-in GPS, outstanding image quality) are all excellent partners. The smaller the stills camera, the more practical the combination for all-day travel.