How to Make Street Photography POV & BTS Videos (Step by Step)
You have seen them all over your feed: a street photographer walks a city, raises their camera, and — click — the still they just shot drops into the video right at the moment they pressed the shutter. The footage carries on. Another corner, another frame, another click. By the end you have watched someone make their photos, not just look at them. That is a POV / behind-the-scenes (BTS) video, and it is the single most effective format for a photographer to grow on Instagram Reels, TikTok and YouTube right now.
Here is the thing nobody tells you: the shooting is easy. The editing is what kills these videos. Lining up 30 photos to the exact second they were taken across an hour of footage, by hand, in a desktop editor, is hours of soul-destroying scrubbing. Most photographers try it once and never post again.
This guide shows you the entire workflow — what these videos are, why they work, the gear, and a full step-by-step (with app screenshots) of how POV Syncer auto-syncs every photo into your footage using the timestamps your cameras already record. What used to take an evening now takes about five minutes, on your phone, before your coffee goes cold.
Make your first BTS reel today
POV Syncer is free to use during the open beta — every feature unlocked. Import your footage, pick your photos, and the app places each shot at the exact moment you took it. No scrubbing.
Download POV Syncer FreeWhat is a street photography POV / BTS video?
A POV (point-of-view) street photography video is footage shot from your own eyeline — usually with smart glasses like Ray-Ban Meta or a small action camera — that shows the street the way you saw it. A BTS (behind-the-scenes) video takes that one step further: it weaves your finished stills into the footage at the exact moments you captured them, so the viewer experiences both the process and the payoff.
It answers the question every viewer silently asks when they see a great street photograph: "How did you get that shot?" The footage shows the patience, the framing, the near-misses; then the photo lands with a shutter click and they see exactly what you saw. That combination is far more engaging — and far more shareable — than posting the photo on its own.
Why BTS POV videos grow a photography audience
Three reasons this format outperforms almost everything else a photographer can post:
- It is "watch me work," and people love process. Showing how a photo is made builds trust and authority faster than a polished grid ever will.
- It is native to the algorithm. Vertical, under 60 seconds, with a hook in the first second — exactly the shape Reels, TikTok and YouTube Shorts reward.
- Every shoot becomes content twice. You already went out and shot. The BTS video is a second deliverable from the same walk, with no extra shooting.
The only barrier has ever been the edit. Remove that, and a photographer can post a strong BTS reel from every session. That is the whole point of POV Syncer.
It's more than content — it makes you a better photographer
Growth is the obvious payoff, but POV footage has quieter benefits that street photographers consistently mention. It lets you relive the shoot — the interactions, the near-misses, the moment the light changed. It is a genuine learning tool: watching yourself back, you notice the times you should have worked the scene harder or been bolder stepping in close. And it does double duty — you make something to teach and share while you are simply out shooting for yourself. As street photographer Eric Kim puts it, you are "killing two birds with one stone." Don't shoot for the algorithm; shoot the work you'd make anyway, and let the video be an honest record of it.
The gear: Ray-Ban Meta + any camera
You need two things rolling at once: something capturing your POV, and your normal stills camera.
Your POV camera
Ray-Ban Meta glasses are ideal for street because they are invisible — people behave naturally when there is no camera pointed at them, which is the whole game in candid work. A few settings worth knowing:
- Gen 2 glasses shoot up to 3K at 30fps, or 1080p at 60fps. Use 1080p/60 for longer walks and social clips to save battery and storage; 3K when you want maximum quality to reframe later.
- Set stabilisation to Medium for everyday walking — it smooths your stride without that over-processed "gimbal" look.
- A GoPro, DJI Osmo Action or Insta360 on a chest mount works exactly the same way if you prefer higher image quality over invisibility. See our Ray-Ban Meta vs GoPro comparison.
Your stills camera
Literally any camera that writes an EXIF timestamp — which is all of them. A Leica Q3, Fujifilm X100VI, Ricoh GR IIIx, a Sony or Canon body, or just your iPhone. You do not change how you shoot at all.
Four ways to capture your POV — pick your rig
"POV" means different things depending on how you mount the camera. All of these work with POV Syncer — it only cares about the timestamps — so choose the rig that fits how you shoot.
- Smart glasses (Ray-Ban Meta). The most natural eyeline, and completely invisible on the street so subjects behave normally. Best for candid work where a visible camera would change the scene.
- Chest-mounted action cam (GoPro, DJI Osmo Action, Insta360). Higher image quality and rock-steady stabilisation. The mid-chest angle shows the street environment and catches your hands as you raise your camera — very "process".
- Camera-top hot-shoe mount. Clip a small action or 360 cam onto your stills camera's hot shoe. Street photographers like Eric Kim popularised this: the POV points exactly where your camera points, and your hands and controls stay in frame. Any camera takes the mount — a Ricoh GR, Fujifilm, or Lumix all work.
- 360 camera on the hot shoe or a short "invisible" stick. As Fstoppers notes, the big win with a 360 cam is that you reframe after the fact — follow yourself working, keep your hands and camera in shot, and crop the same capture to both 9:16 for Reels and 16:9 for YouTube. Angle the stitch line diagonally so you stay visible, and turn on horizon lock if you switch between portrait and landscape.
Whichever you pick, you don't shoot any differently — and POV Syncer matches your photos the same way every time.
The hard part — and why you skip it
In a desktop editor the workflow is brutal: import the clip, scrub to roughly where a photo was taken, zoom in to find the exact second, drop the photo on the timeline, trim it, repeat — thirty times, across an hour of footage. That is easily two to four hours per video before you add a single title. It is the reason the footage from most photographers' shoots sits on a drive, unwatched.
Search "how I edit my POV photography videos" and you'll find hour-long workflow-breakdown tutorials walking through exactly this scrub-find-place grind. It's honest work, but it's the bottleneck. POV Syncer collapses that entire workflow into a single tap.
The fix: POV Syncer matches everything automatically
POV Syncer reads the timestamp already baked into your video and the EXIF timestamp on every photo, and places each shot at the exact moment it was taken. No AI guesswork, no manual reference point — just the clocks, accurate to the second. It runs on iPhone, iPad and Apple Silicon Mac, and the whole thing takes about five minutes. Here is the entire workflow.
Step 1 — Add your video and photos
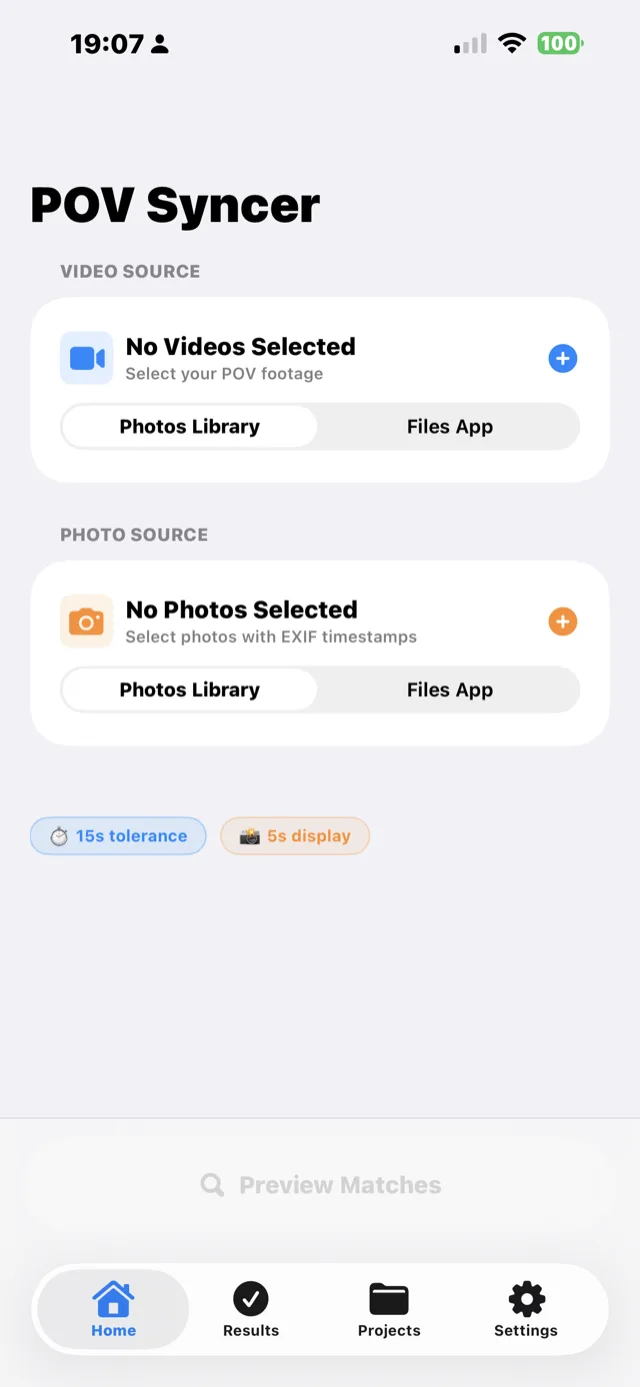
Open POV Syncer. On the Home screen, pick your POV clip as the Video Source and your session's stills as the Photo Source — from your Photos library or the Files app. Add the whole batch; you do not need to pre-sort anything, and the app reads only metadata up front so big imports stay fast.
Step 2 — Preview the matches
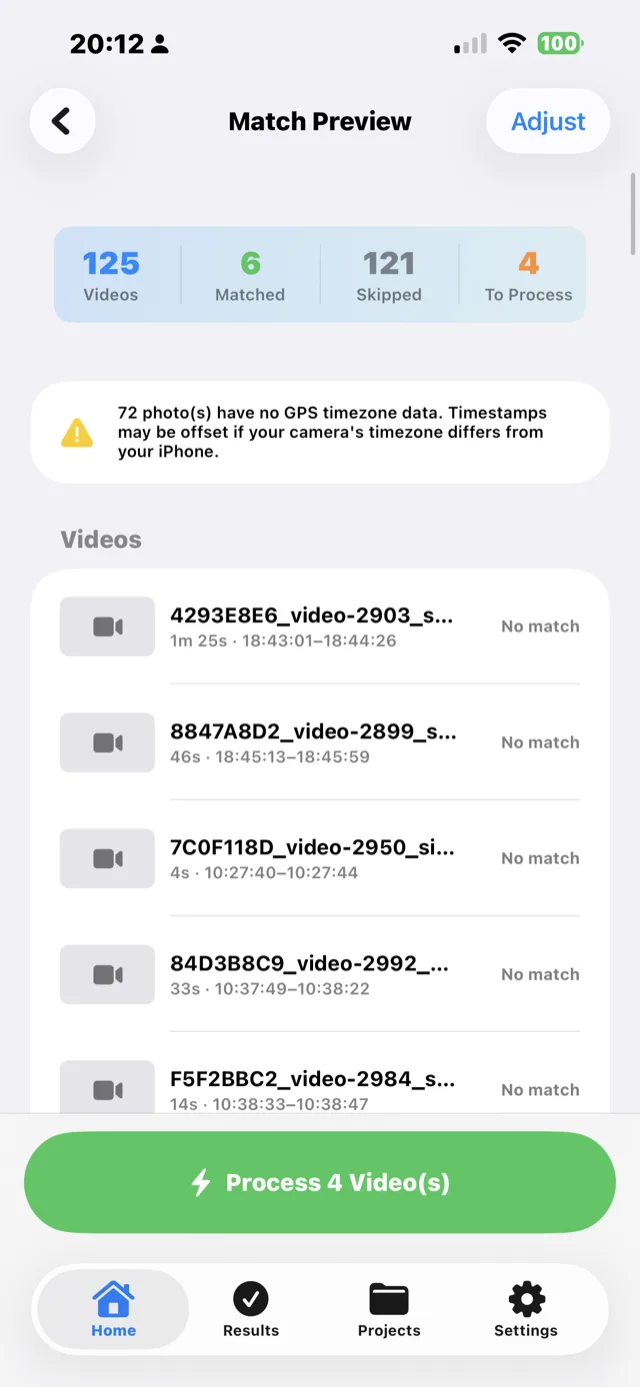
Tap Preview Matches. Before you commit to anything, POV Syncer shows how many videos matched, how many photos fell inside each clip's time window, and what it is about to process. This is your chance to widen the tolerance if your camera clock was a little off — nothing is rendered until you say so.
Step 3 — Process the video
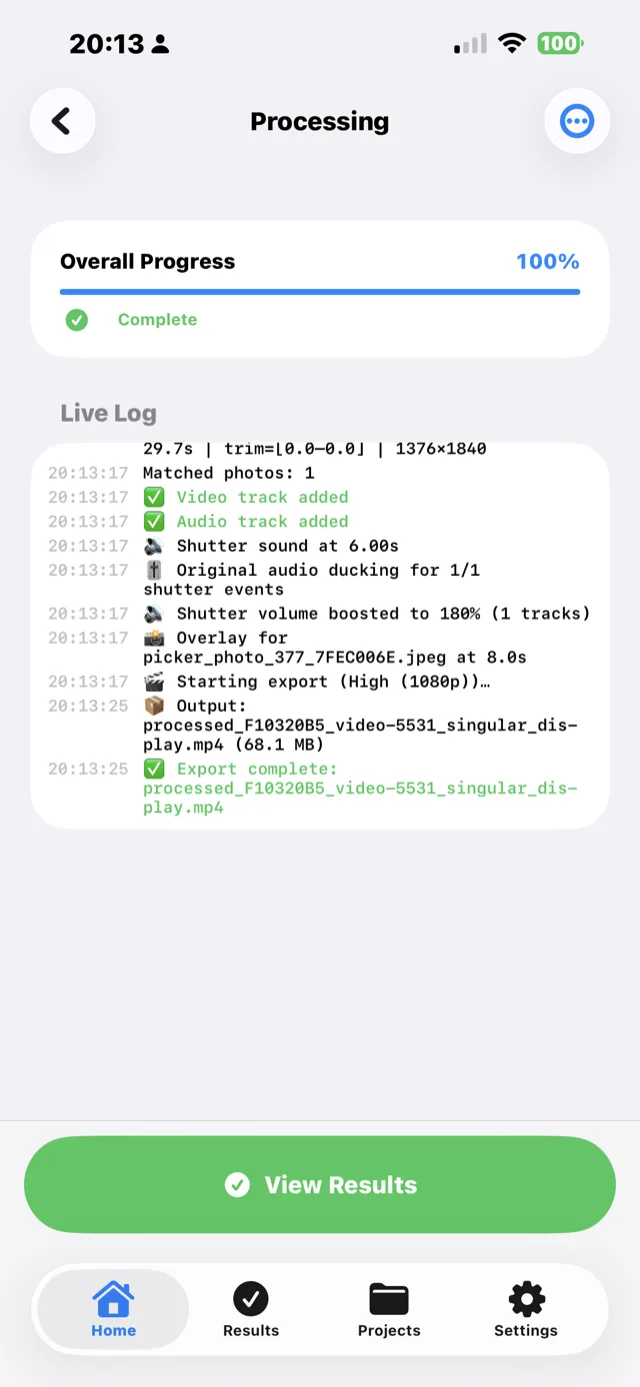
Tap Process and POV Syncer renders the clip: it drops each photo in at its captured moment, adds a shutter click as it appears, and bakes in any titles, captions or narration you have set. A live log shows every step, so if anything looks off you have a full record. Nothing leaves your device — it all renders locally.
This is the part that used to take all night
POV Syncer does the matching for you. It is free during the beta, with every feature unlocked — including AI voice narration.
Get POV Syncer FreeStep 4 — Review the result
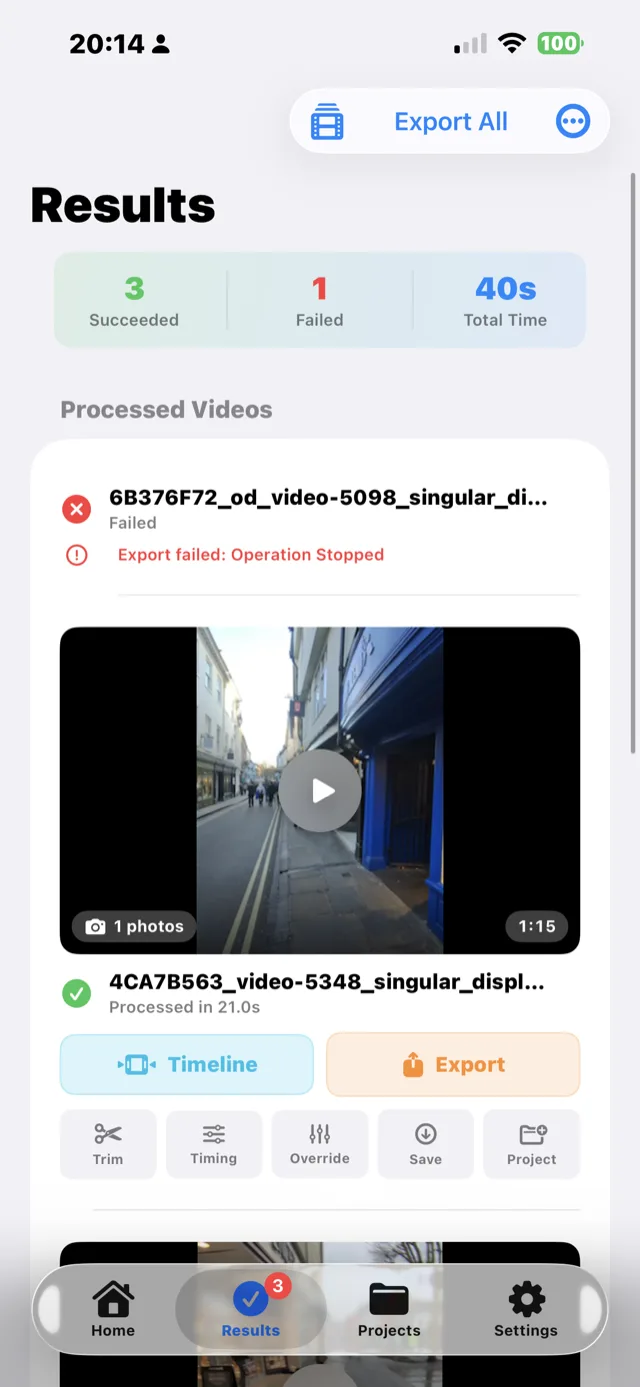
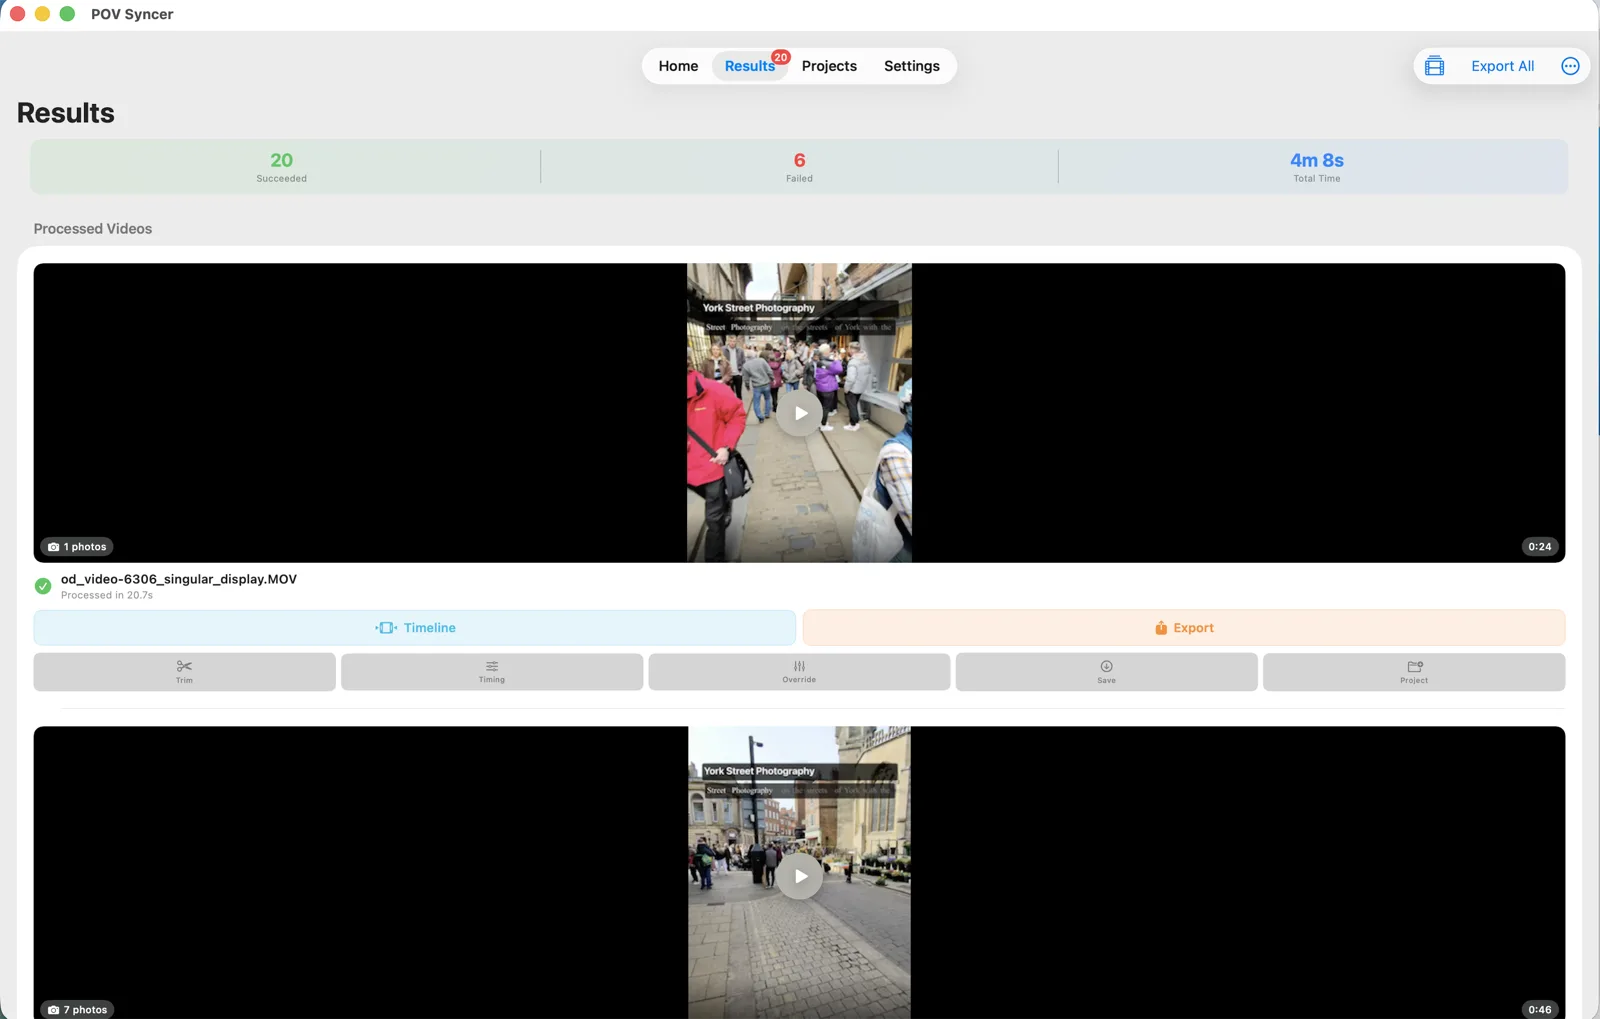
The Results screen lists every finished video with an inline player and a photo count. Tap to watch it back and check the timing. If a clip is exactly how you want it, you are done — share it straight away. If you want to refine, every video has Trim, Timing, Override and Timeline controls.
Step 5 — Polish on the timeline (optional)
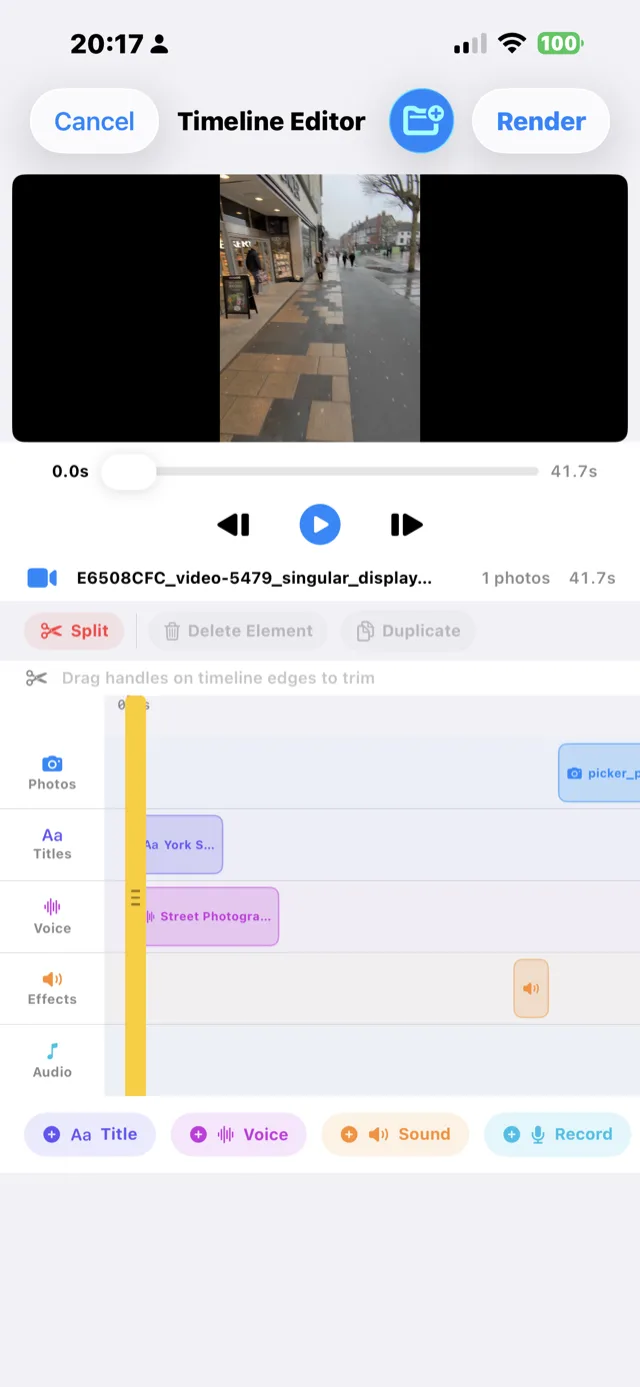
For a more produced BTS reel, open the Timeline editor. It has tracks for photos, titles, voice, effects and audio. The moves that make a street BTS video sing:
- Title card: a location and time — "Brick Lane, 4:30pm" — sets the scene in the opening seconds.
- AI voice narration: one spoken line — "I'd been watching this corner for ten minutes waiting for the light" — adds the interior story photos can't. Six neural voices (UK, US, AU) are included.
- Karaoke captions: burn in subtitles so the reel works with the sound off.
- Shutter sound & photo duration: keep the click on (it punctuates each frame) and hold each photo 2–3 seconds for a street pace.
- Music & your own audio: drop a track from the built-in music library under the footage, or import your own.
- Branding: add stickers, an auto-generated intro, or append an outro/credits clip to every export.
Step 6 — Export to Reels, TikTok or YouTube
Hit Export and share straight to TikTok, Instagram Reels or Stories, save to your camera roll, or AirDrop it. Keep it vertical and under 60 seconds for maximum reach. Then do the next clip — or use Export All to save a whole shoot's worth at once.
Works on iPhone, iPad and Mac
POV Syncer is the same app across all your Apple devices, so you can shoot and post on the go from your iPhone, lay out a longer edit on iPad, or batch-process a big shoot fast on an Apple Silicon Mac. Projects, settings and the timeline behave identically — pick whichever screen suits the moment.

Under the hood: how POV Syncer nails the timing
The reason POV Syncer can place a photo on the exact frame — not "roughly there" — is that it never guesses. Most "auto" tools try to match on audio waveforms or AI scene detection. POV Syncer reads the clocks, using a four-strategy priority system to find the most reliable timestamp for every photo:
- GPS UTC — the gold standard. Cameras and phones with GPS (Leica Q3, Sony bodies, iPhone) stamp a timezone-proof UTC time on each frame.
- OffsetTimeOriginal — the EXIF field recording your timezone offset, used when there's no GPS fix.
- GPS-corrected timezone — derives the right offset from location data when the offset field is missing.
- Device timezone fallback — keeps things working even for older cameras that only write a plain local time.
A few details that make it reliable in the real world:
- Tolerance. You set how close a photo's timestamp must be to a moment in the video to count as a match — widen it if a camera clock drifted, tighten it for dense shoots. (See Reading the Match Preview.)
- Per-video timing offset. If a whole clip lands a beat early or late, nudge the shutter offset once and every photo on that clip shifts with it.
- Sensible limits. POV Syncer caps overlays at 100 photos per clip and spreads them evenly across the timeline, so a huge burst never overwhelms the edit or your phone's memory.
- Private and on-device. Matching and rendering happen locally — your photos and footage never leave your device. Only AI voice synthesis uses the internet.
- Built for volume. Import up to 2,000 photos and videos at once, batch-process a whole shoot, and use Export All to save everything to your library in one step — especially fast on an Apple Silicon Mac.
Get the free POV Photography tips list
Join photographers getting practical tips on POV & BTS reels — gear settings, hooks that hold attention, and the fastest ways to turn a shoot into content.
Free. No spam. Unsubscribe anytime.
Tips for BTS POV videos that actually perform
- Hook in the first second. Open on your strongest frame or a "watch me get this shot" moment. The first second decides whether anyone sees the rest.
- Leave the glasses rolling. The best moments are often the walk between shots — the scanning, the waiting. Record continuously and trim later.
- Shoot 20–40 stills per hour of footage. That density shows selectivity without becoming a rapid-fire slideshow.
- Stay vertical, stay under 60 seconds. Reels, TikTok and Shorts all reward it. A tight 30–45 seconds usually beats a loose 90.
- Move deliberately. Smooth pans and a steady pace read as cinematic; whipping your head around does not.
- Shoot exactly as you normally would. You never have to signal the camera or press a reference button — the EXIF timestamps do all the syncing invisibly.
Free during the beta
POV Syncer is in open beta and free to use right now — every feature unlocked, including AI voice narration, the reusable Voice Library and karaoke captions. There is no watermark and nothing to buy. After launch the core app stays free, and AI voice becomes a paid Pro feature (pricing announced before launch, with plenty of notice for beta testers). It is the perfect time to build the habit of posting a BTS reel from every shoot.
Conclusion: post the video tonight
Street photography POV and BTS videos are the most powerful way to grow a photography audience — and the only thing standing between you and posting them has always been the edit. Your glasses and your camera are already writing matching timestamps to every file. POV Syncer reads them and builds the video automatically, in minutes, on the device in your pocket.
Clip on the glasses. Walk. Shoot as you always do. Sync in seconds. Post while the shoot is still fresh.
Ready to make your first BTS reel?
Download POV Syncer free and turn today's street walk into a video before you get home. Or join the tips list for gear settings and reel ideas.
Free during the beta. Email list: no spam, unsubscribe anytime.